Webpack Bundle Analyzer is a tool to visualize and analyze the size of JavaScript application bundles. You can use it to identify any large and redundant modules contributing to the overall bundle size.
As your app grows in complexity and accumulates more packages, your bundle can quickly become too large. This impacts your app's overall performance, especially during the initial load when the bundles need to be downloaded and parsed.
The bundle analyzer provides a detailed breakdown of your application's bundle size and composition, including the size of individual modules and their dependencies.
In this guide, we'll create a simple React application that has some performance issues. We'll then use Webpack Bundle Analyzer to analyze the application bundle and identify the areas that require optimization.
Using the Bundle Analyzer to improve your app's performance
To demonstrate how Webpack Bundle Analyzer works, we'll create a React application and analyze its bundle.
We'll set up Webpack Bundle Analyzer using the conventional method and a configuration utility called CRACO (Create React App Configuration Override). Finally, we'll see how to optimize the bundled result and check the optimized build size.
Initializing a React application
First, ensure Node.js is installed on your computer, as it's needed to create a React app. Proceed to your preferred directory and run the following command to initialize a React application:
npx create-react-app authors_app
This will scaffold a very basic React app that you can use to build a more complex application. To test if the new app is working, proceed to the newly created authors_app directory:
cd authors_app
Run npm start to ensure the development server is running, and test your application at http://localhost:3000/.
Before creating the demo app, you should first analyze the size of the initial bundle. This will help you understand how your bundle size changes based on the modifications you make to your application to create the final production build.
Setting up Webpack Bundle Analyzer
In the project directory, install the Webpack Bundle Analyzer plugin. Note that its dependencies are only required for development and not in a production environment. Therefore, a -D flag will instruct Node.js to save the dependencies only for development purposes:
npm i -D webpack-bundle-analyzer
In the project root directory, create a file called analyzer.js. This file will host the configuration for Webpack Bundle Analyzer. The next step is to generate a production build by creating a Webpack bundle script.
Start by defining the environment at the top of analyzer.js:
process.env.NODE_ENV = "production";
Import the Webpack module and the Webpack Bundle Analyzer plugin package:
const webpack = require("webpack");
const BundleAnalyzerPlugin =
  require("webpack-bundle-analyzer").BundleAnalyzerPlugin;
Define the Webpack configuration for production:
const webpackConfigProd = require("react-scripts/config/webpack.config")(
  "production"
);
Add the bundle analyzer plugin to the webpack configuration:
webpackConfigProd.plugins.push(new BundleAnalyzerPlugin());
Finally, run the Webpack build and log any errors:
webpack(webpackConfigProd, (err, stats) => {
  if (err || stats.hasErrors()) {
    console.error(err);
  }
});
To execute analyzer.js and trigger Webpack builds, edit the package.json script's tags to host the analyze command:
"analyze": "node analyzer.js"
Run the following command to start the Webpack analyzer:
npm run analyze
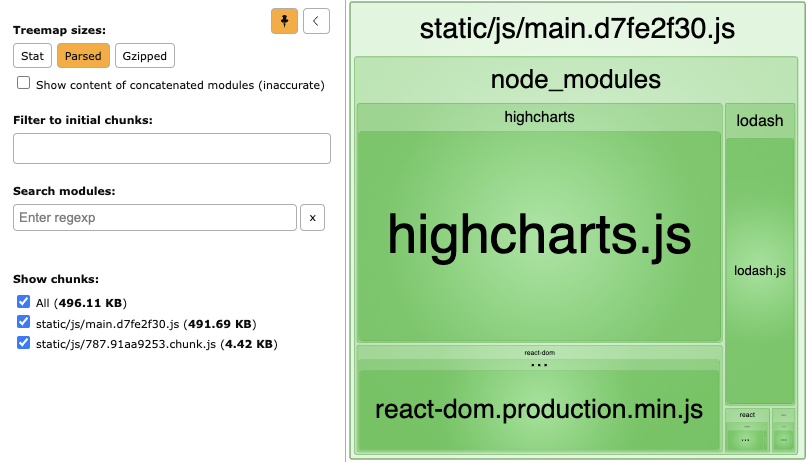
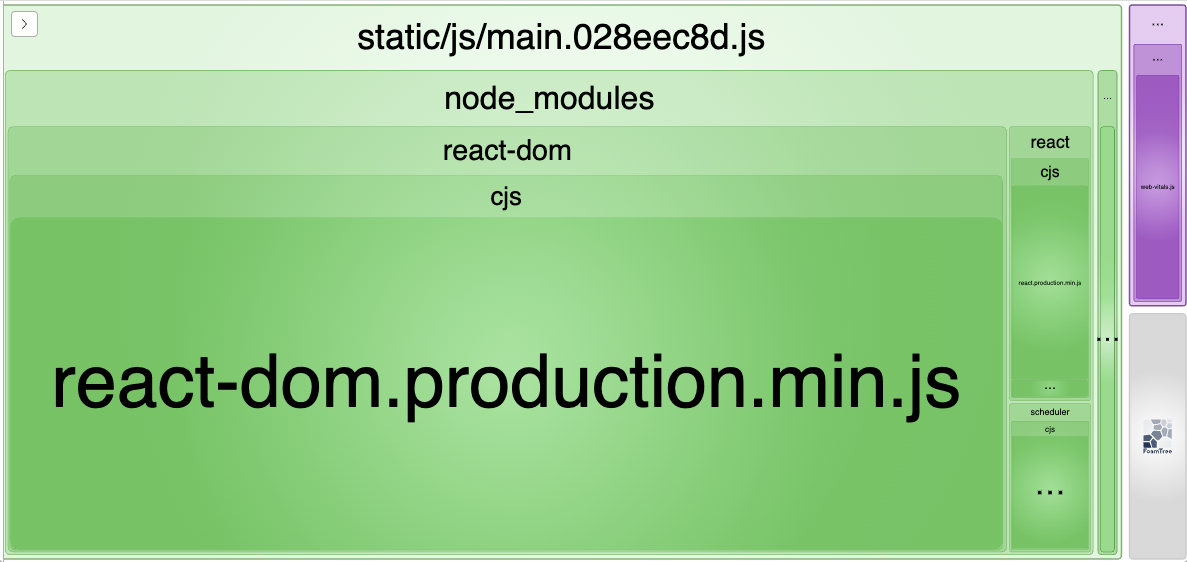
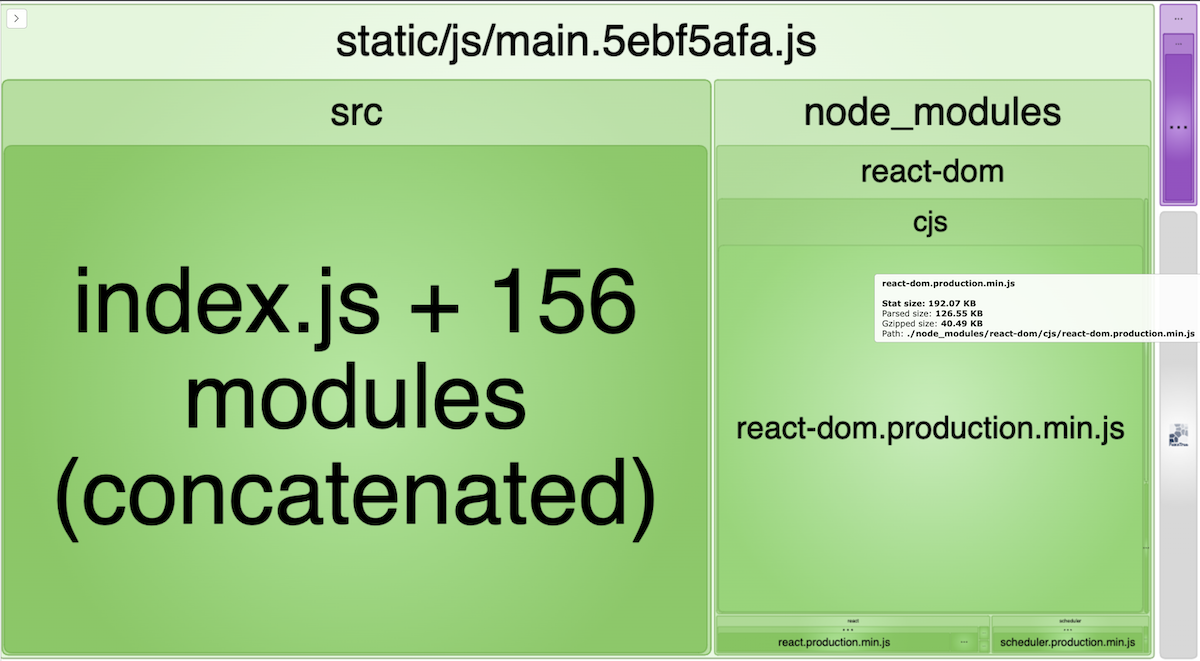
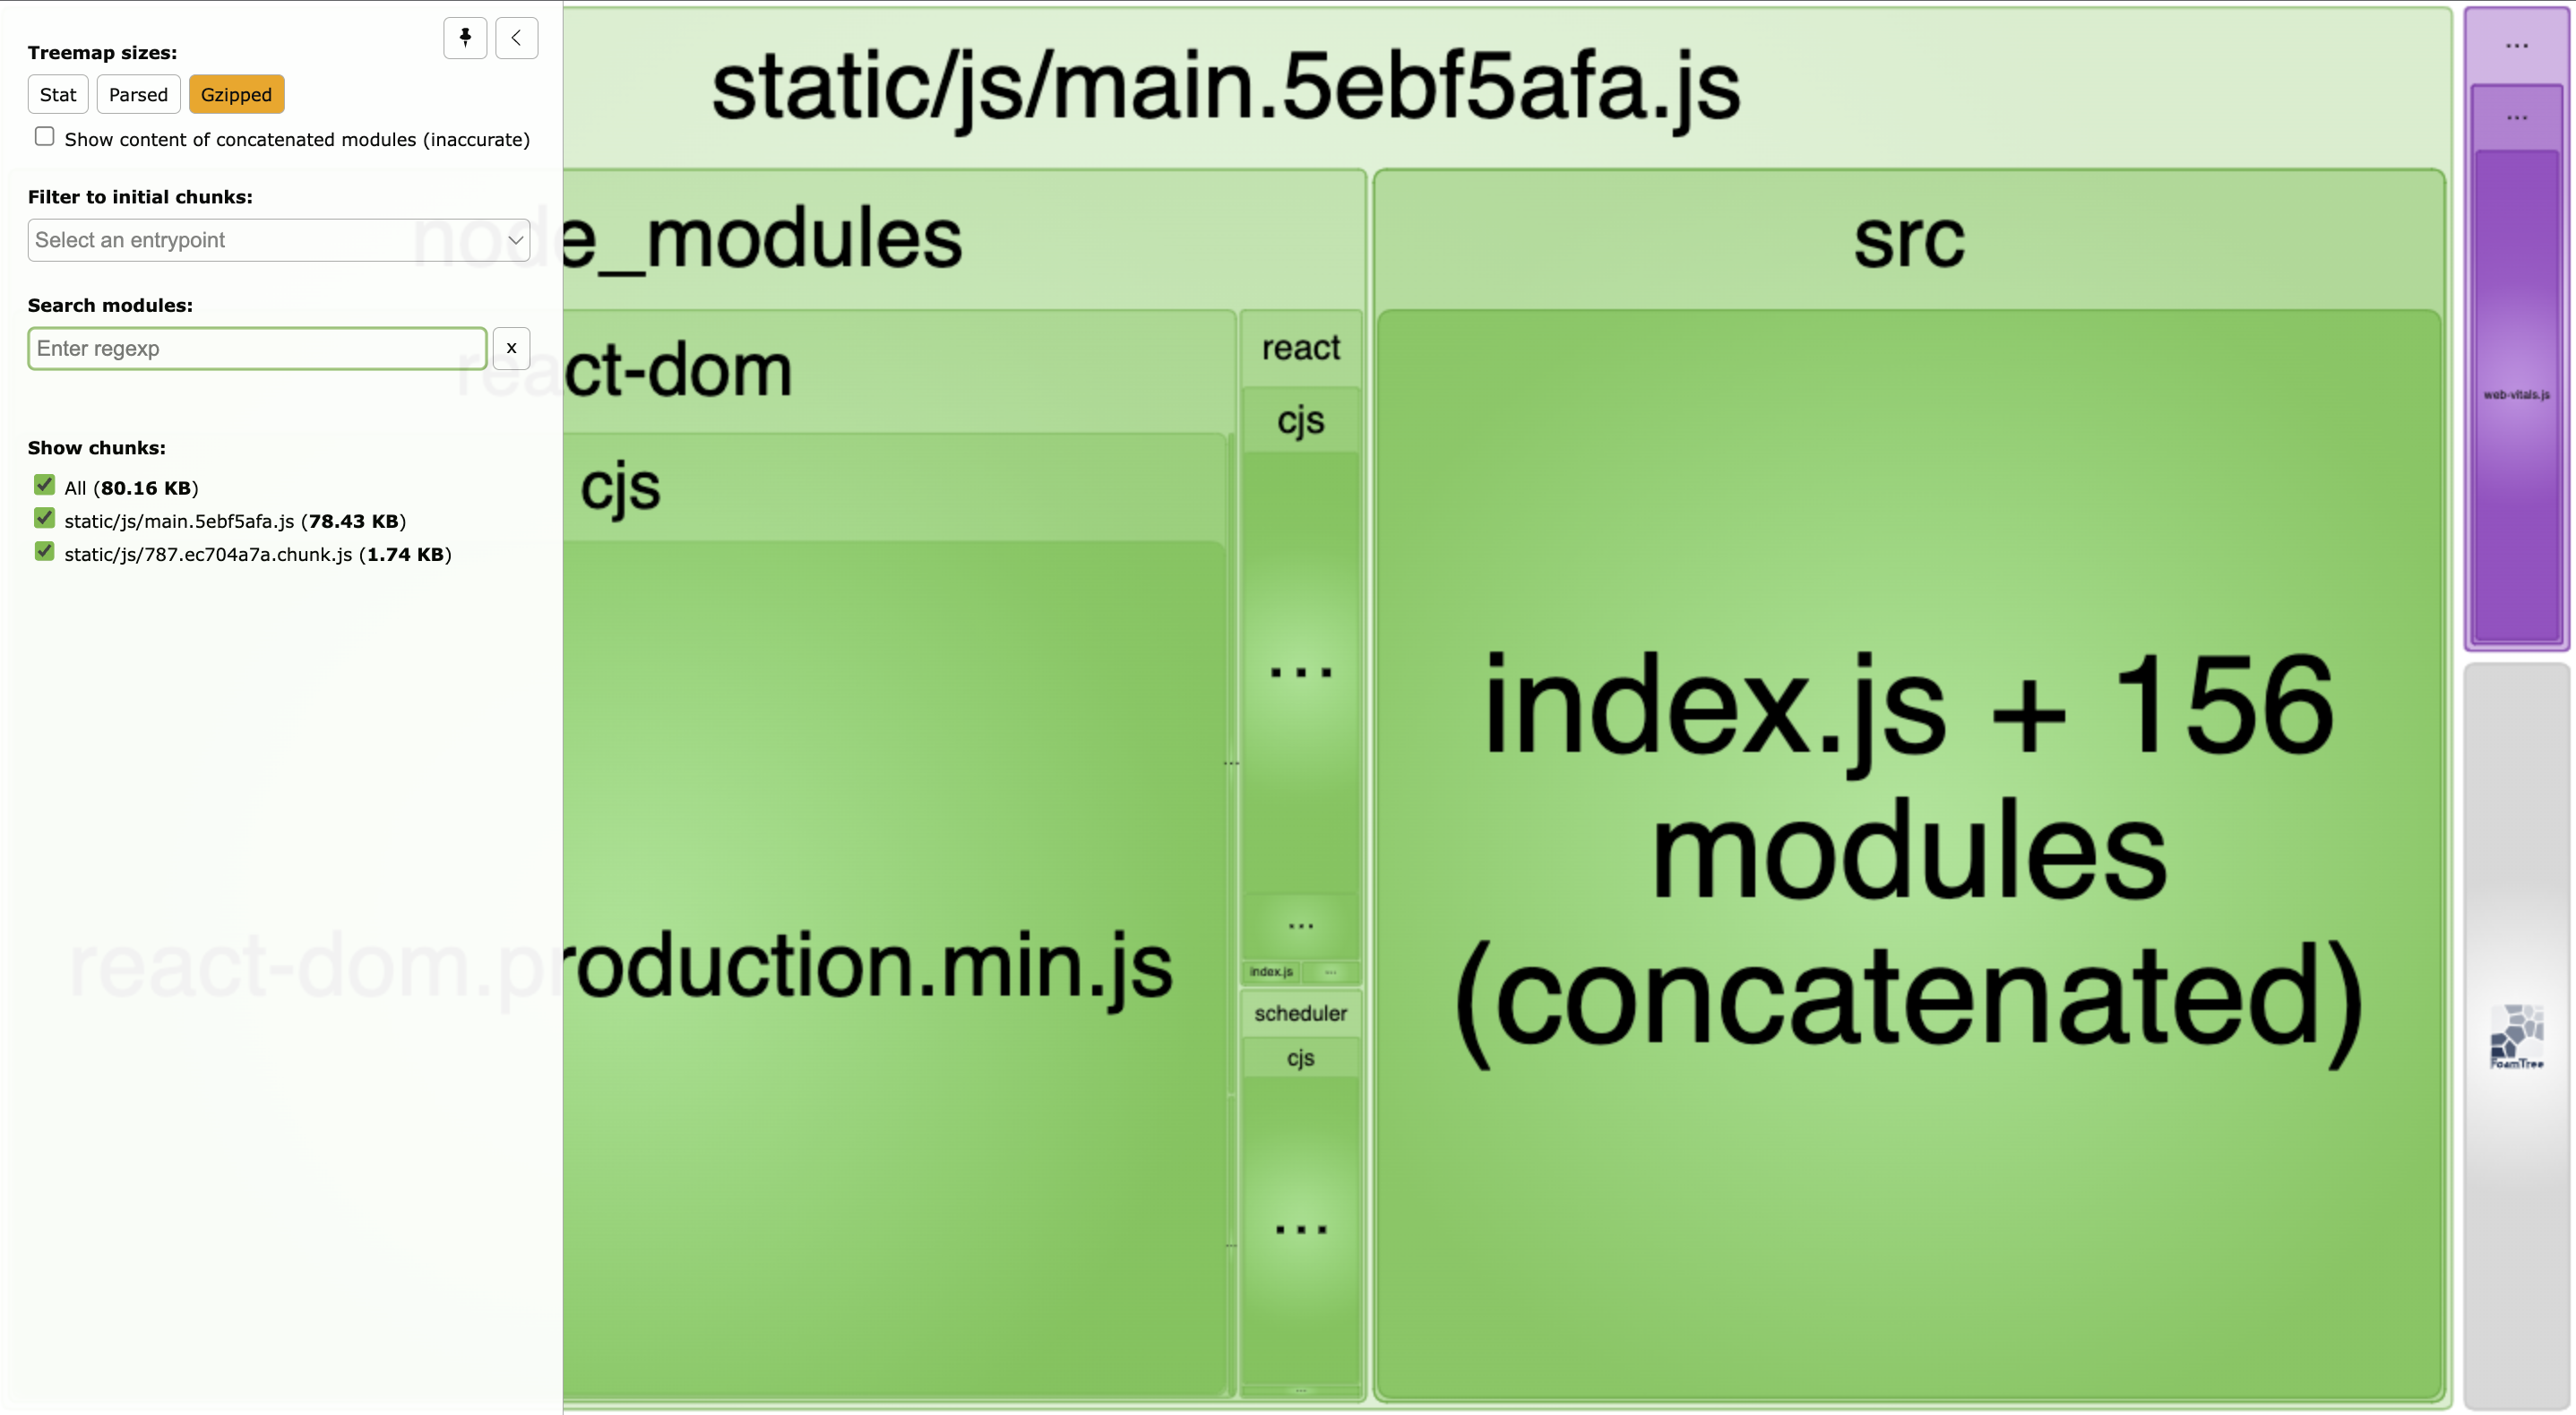
This will show you a treemap visualization showing how large the different bits of the application code and libraries are in the bundle. Here we can see that react-dom is the biggest dependency.
Alternatively: Set up Webpack Bundle Analyzer using CRACO
Following the same approach, you can use CRACO to write Webpack build scripts. CRACO (Create React App Configuration Override) is a configuration utility for Create React App. It allows you to extend and customize the build process of any Create React App project without losing the benefits of the Create React App toolchain.
CRACO intercepts and modifies the Webpack configuration used by Create React App. This provides a simple API for modifying aspects of the Webpack configuration. This includes the build process's entry point, output path, loaders, and plugins.
To install CRACO, use the following command:
npm install -D @craco/craco webpack-bundle-analyzer
Once the above package is installed for your project, create a craco.config.js file to hold the configurations for the analyzer:
const BundleAnalyzerPlugin =
  require("webpack-bundle-analyzer").BundleAnalyzerPlugin;

module.exports = function () {
  return {
    webpack: {
      plugins: [new BundleAnalyzerPlugin({ analyzerMode: "server" })],
    },
  };
};
This will set up the Webpack Bundle Analyzer plugin with a React app using CRACO. This configuration object contains a new instance of BundleAnalyzerPlugin, along with another configuration object that sets the analyzerMode option to "server". This tells the plugin to open a browser window with a live server that displays the bundle analysis report.
To start the React app using CRACO, run the following command:
npx craco build
Run A Free Page Speed Test
Test Your Website:
- Automated Recommendations
- Detailed Request Waterfall
- Web Vitals Assessment
Interpreting the initial bundle size analysis
Your React app can now use the Webpack Bundle Analyzer plugin to analyze your Webpack bundles. Whether you use npx craco build or npm run analyze, the bundle analysis report will automatically open in your default browser. This allows you to visualize the size of your initial app bundle:
This visualization represents the bundling results of the original React application. Its chunks are as follows:
- Stat: 223.59 KB as the initial source code size
- Parsed: 145.2 KB as the compiled code bundle size
- Gzipped: 47.27 KB as the compiled bundle size when gzipped
Setting up the demo project
The remainder of the article uses a demo project to illustrate how the Webpack analyzer handles bundling in a React app. We'll create a simple app that retrieves information about authors from a public API. We'll include some intentional errors in the app's code. These errors will help to demonstrate how the bundle changes in response to various modifications. You'll then learn how to optimize the React bundle size by fixing these issues.
Installing packages
First, we need to install the packages required to build the application.
The application fetches data from a public API. We'll need a few packages to fetch author data and create components to display the information.
Install Axios for performing HTTP requests and Material UI (MUI) for styling components:
npm i axios @emotion/react @emotion/styled @mui/material @mui/styled-engine-sc
The size of the bundle should remain the same after you install these packages. This is because you haven't yet imported any code that uses them.
Creating the components
We'll now build a React component to display the data. The application will import components from Material UI and monitor how they impact the bundle results. You can analyze the resulting bundle size and optimize the imports to include only the necessary components.
To create a component that fetches and displays author data from an external API in your project, you should first create a components directory within the src directory. Inside this directory, create a file called Authors.js. Then import the necessary packages required for your React component to access and use:
// Axios
import axios from "axios";
// React use effect for state management
import { useEffect, useState } from "react";
// The AuthorCard component
import AuthorCard from "./AuthorCard";
// Grid from Material UI
import { Grid } from "@mui/material";
Define an Authors function component:
const Authors = () => {};
Define the state for the Authors component:
const [loading, setLoading] = useState(false);
const [authors, setAuthors] = useState([]);
Then create a useEffect hook that will fetch the Authors:
useEffect(() => {
  setLoading(true);
  axios.get("https://quotable.io/authors").then((response) => {
    setLoading(false);
    setAuthors(response.data.results);
  });
}, []);
If the authors have been loaded we render them as a list of AuthorCard items (we'll build that later):
return (
  <Grid
    container
    spacing={0}
    direction="column"
    alignItems="center"
    justifyContent="center"
  >
    {loading ? (
      <p>Loading</p>
    ) : (
      <div>
        {authors.length > 0 ? (
          authors.map((author, index) => (
            <AuthorCard author={author} key={index} />
          ))
        ) : (
          <div>
            <p>No authors</p>
          </div>
        )}
      </div>
    )}
  </Grid>
);
Export the component:
export default Authors;
In the same components directory, we'll next create a new file called AuthorCard.js for rendering a single author.
In this file you first need to import the necessary components:
import * as React from "react";

import { Box, Card, CardContent, CardMedia, Typography } from "@mui/material";
Define an AuthorCard function that will render the author:
export default function AuthorCard({ author }) {}
In the AuthorCard function, render the author card:
return (
  <Card sx={{ display: "flex", m: 2 }}>
    <CardMedia
      component="img"
      sx={{ width: 151 }}
      image={`https://images.quotable.dev/profile/400/${author.slug}.jpg`}
      alt={author.name}
    />
    <Box sx={{ display: "flex", flexDirection: "column" }}>
      <CardContent sx={{ flex: "1 0 auto" }}>
        <Typography component="div" variant="h5">
          {author.name}
        </Typography>
        <Typography variant="subtitle1" color="text.secondary" component="div">
          {author.description}
        </Typography>
      </CardContent>
    </Box>
  </Card>
);
To run the components, navigate to the App.js file and import the Authors component:
import Authors from "./components/Authors";
Then render the Authors component in the app:
function App() {
  return (
    <div className="App">
      <Authors />
    </div>
  );
}
Now ensure that the development server is running using the following command:
npm run start
Your home page should display the authors' information:
Checking the current bundle size
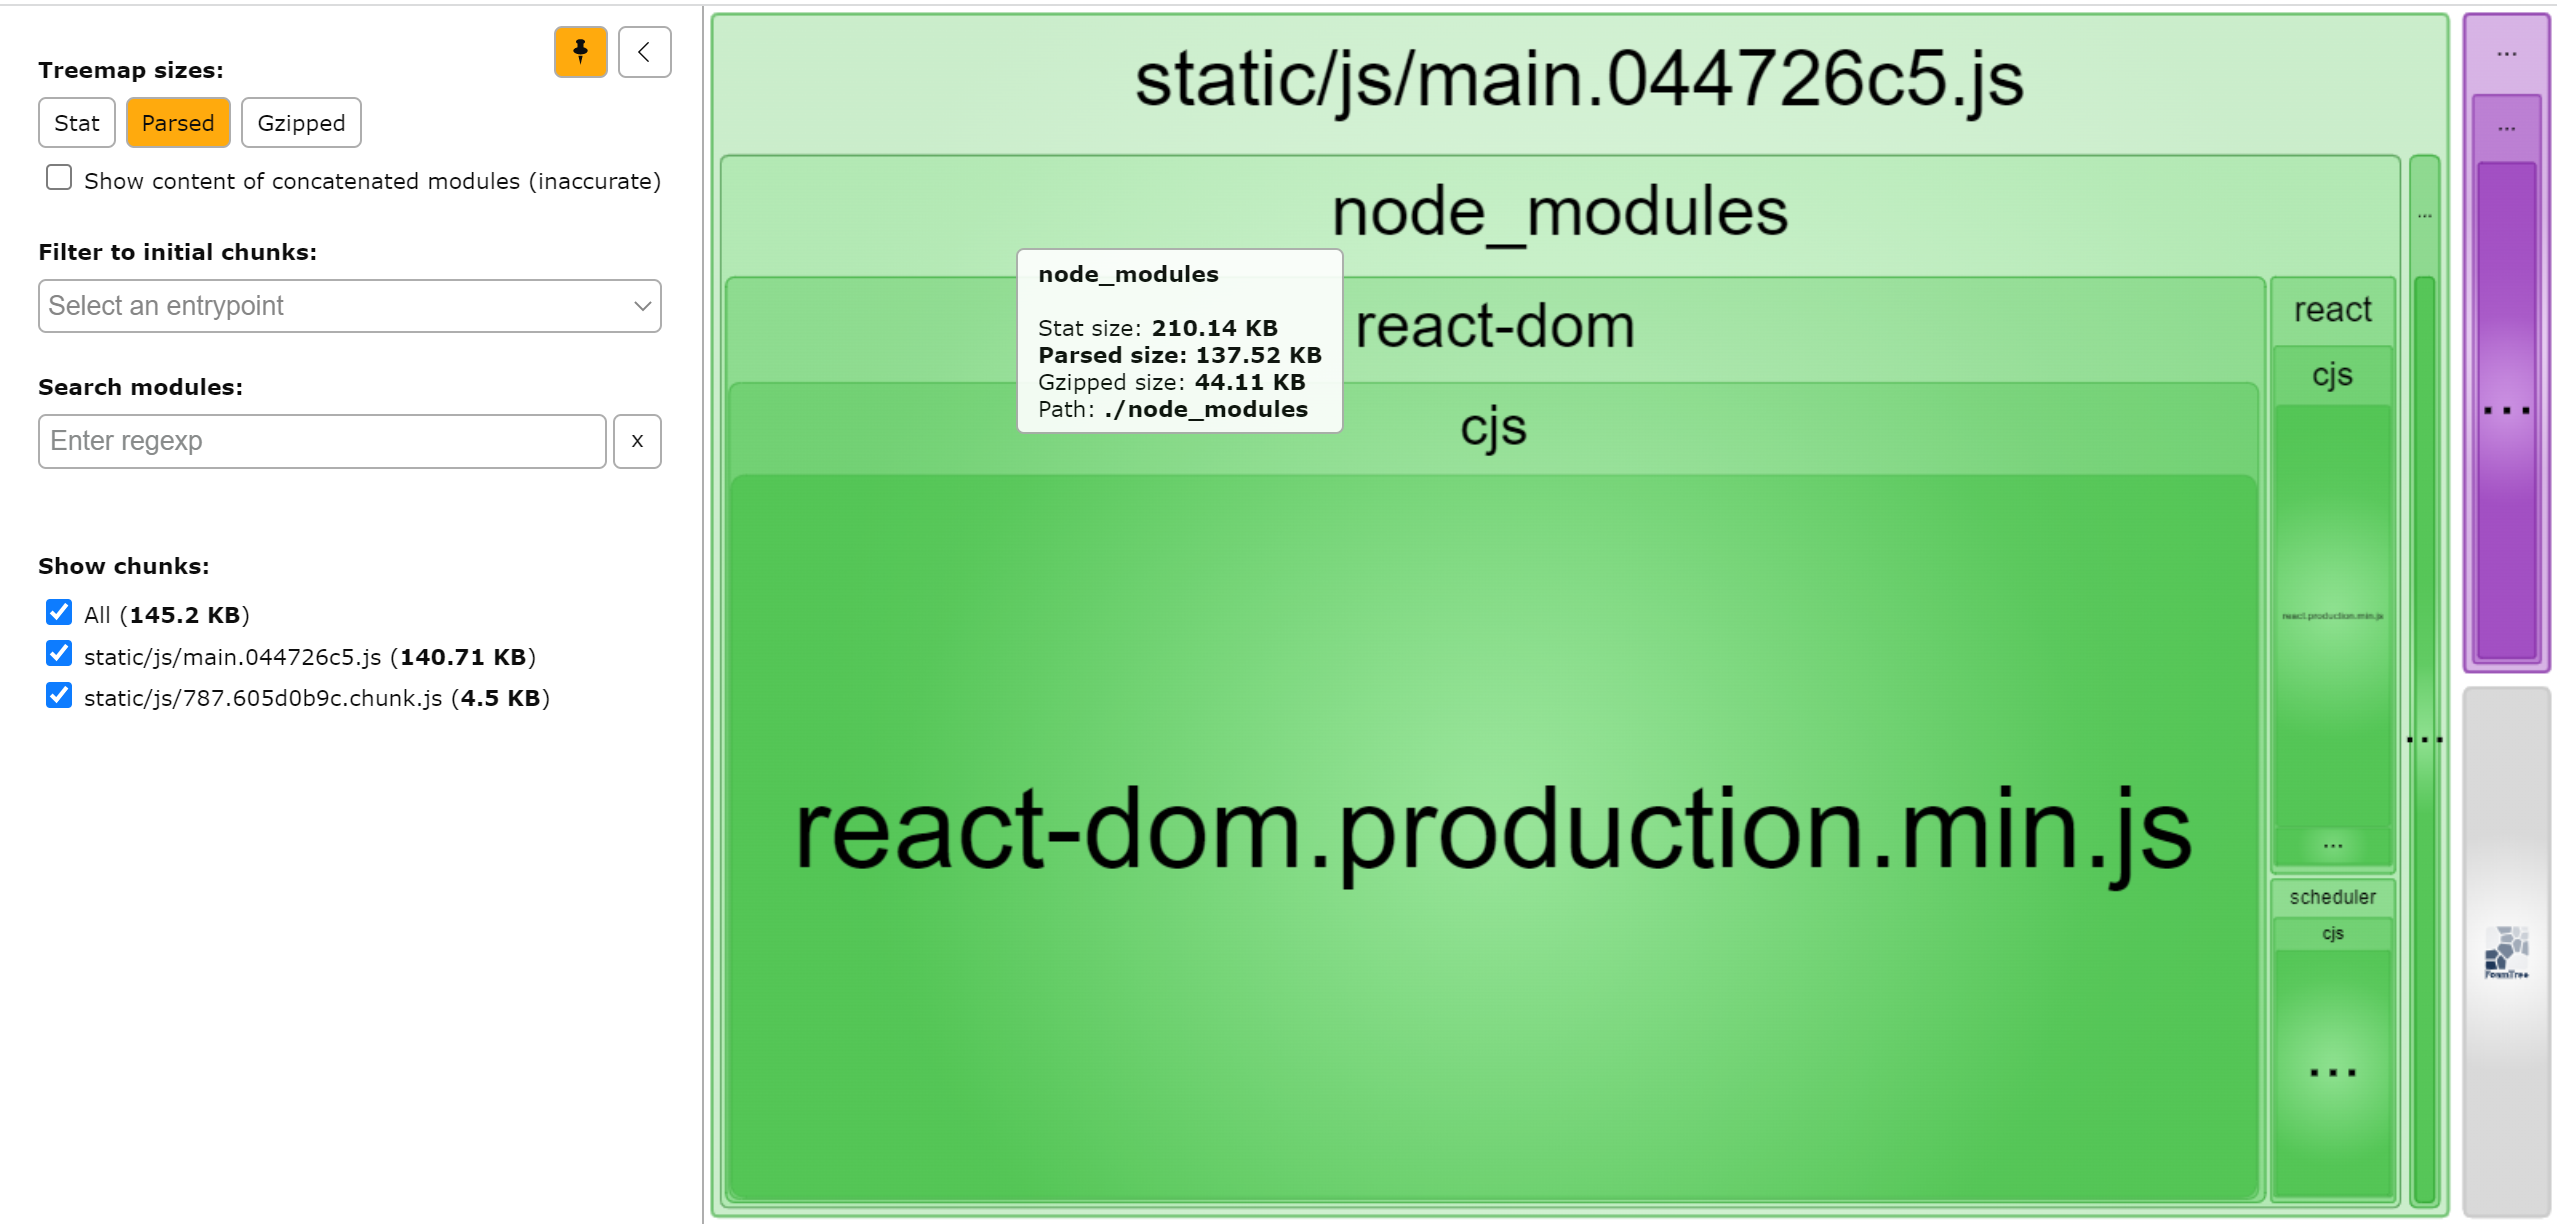
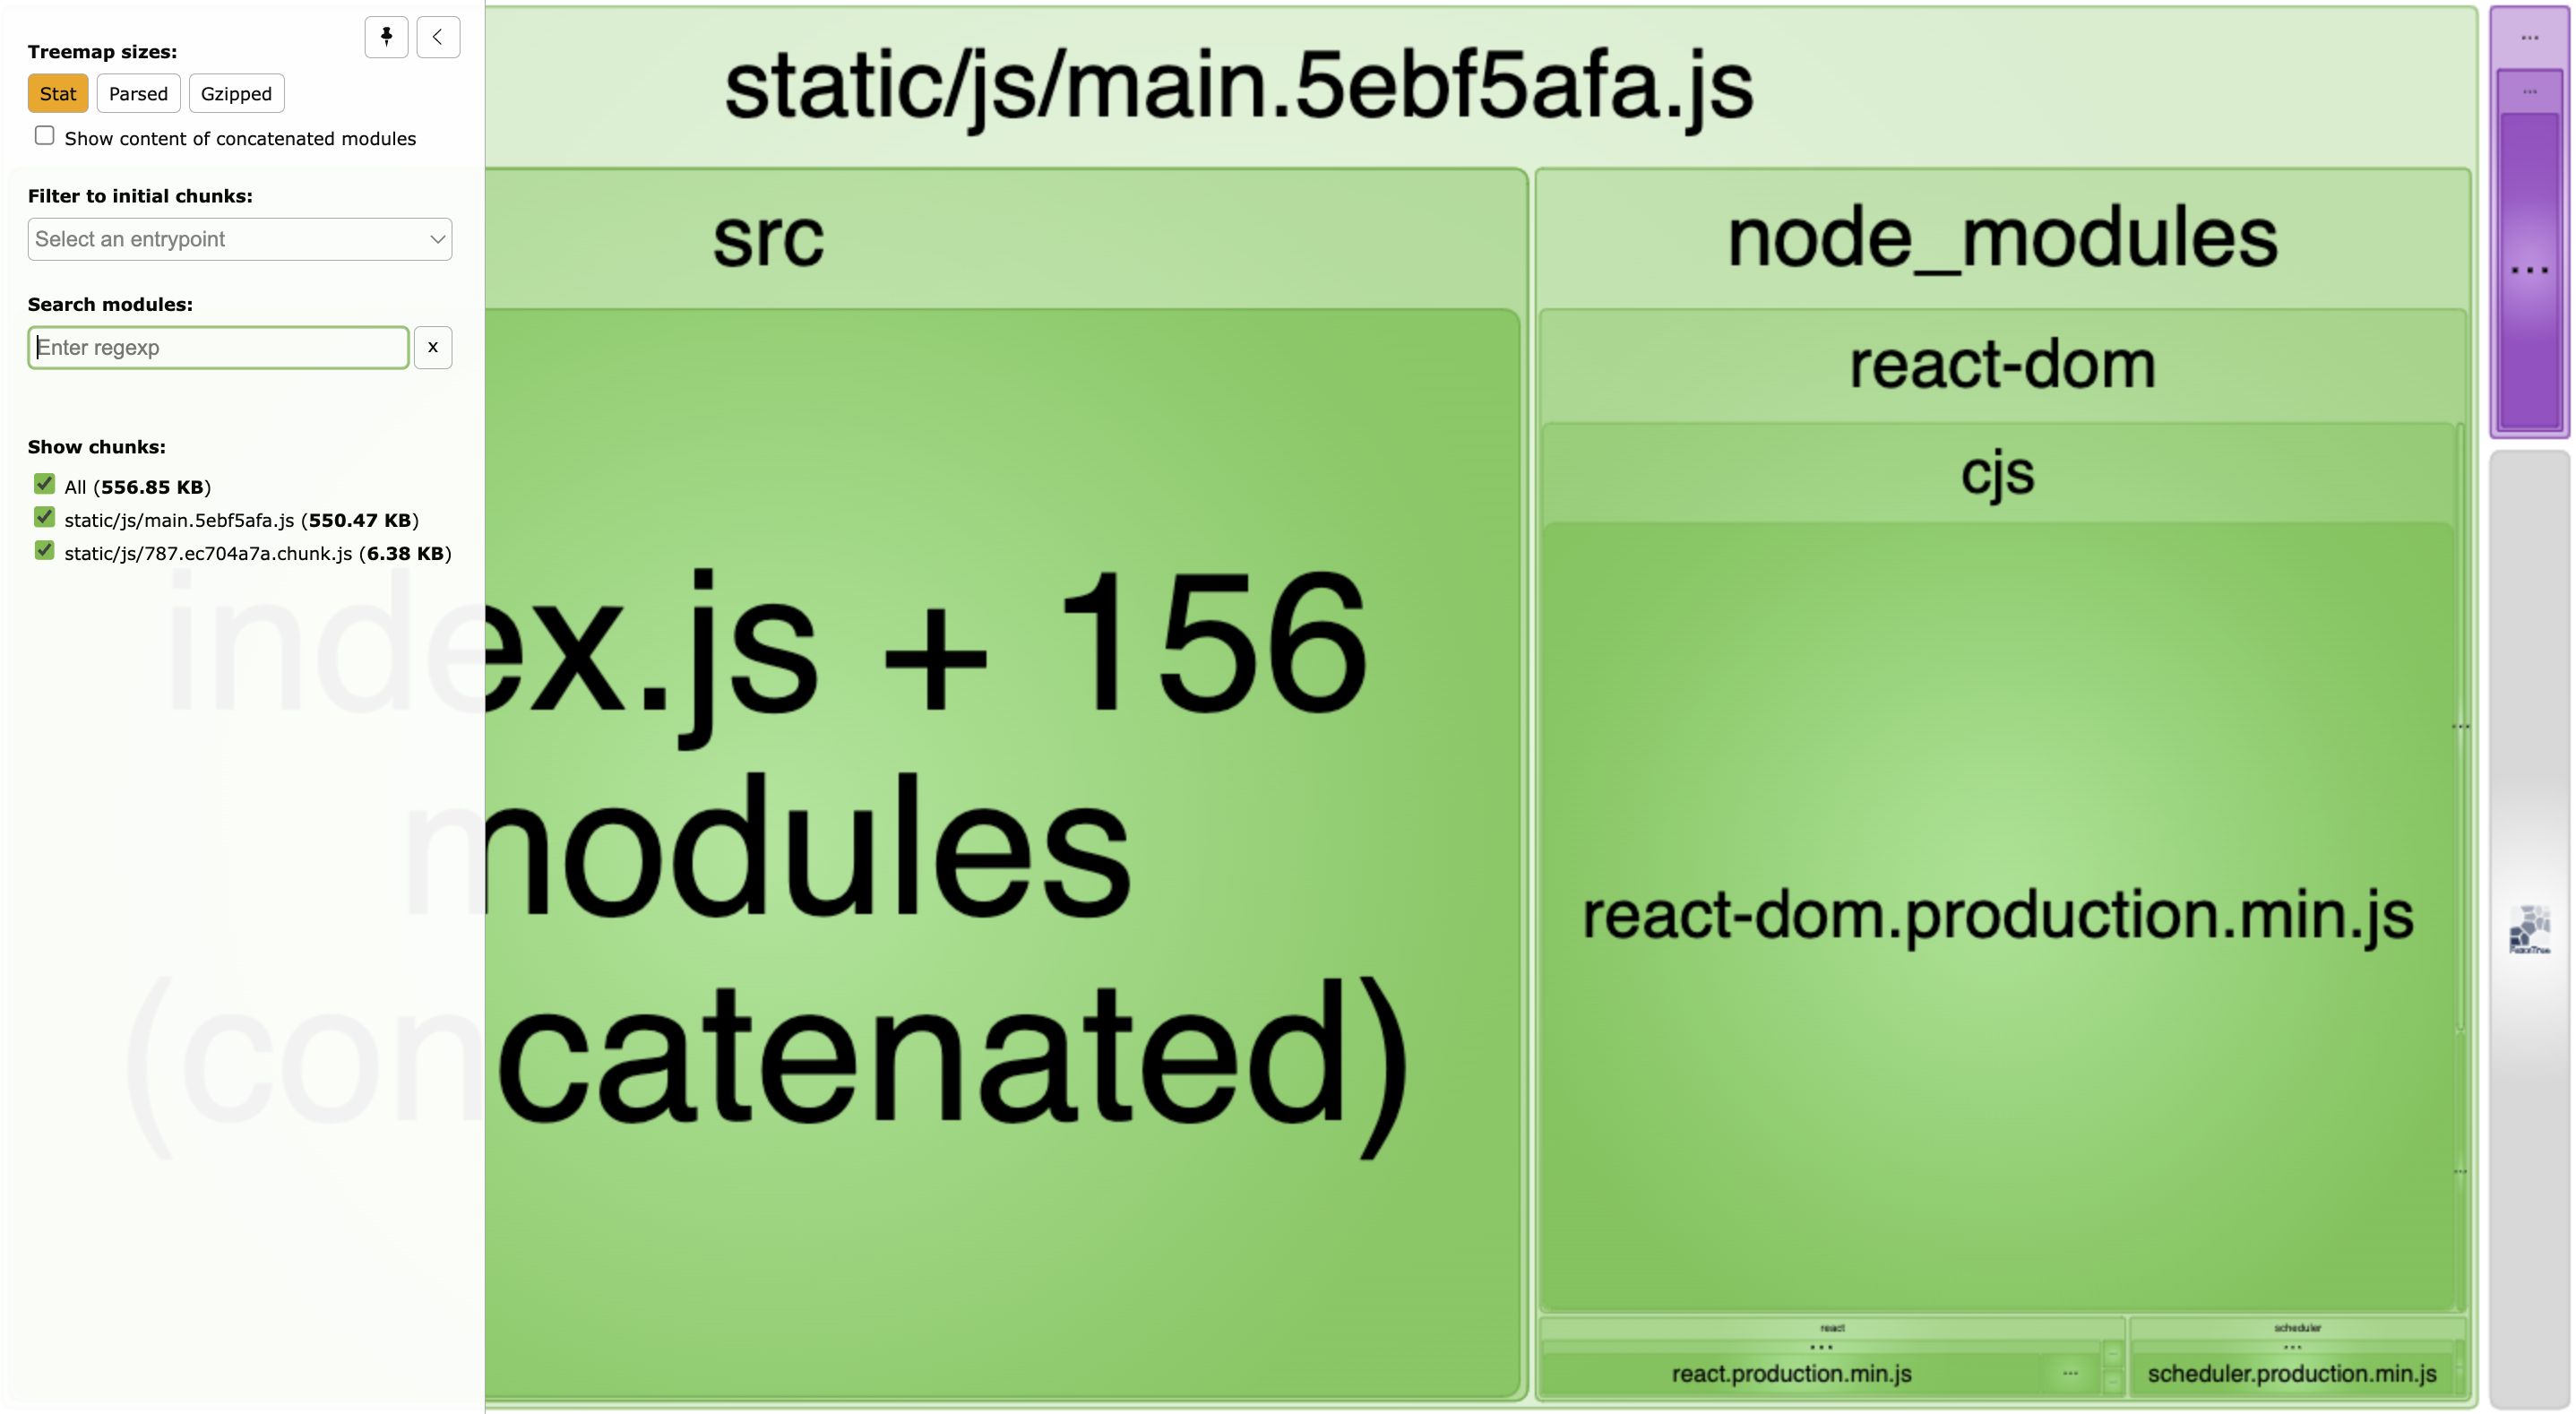
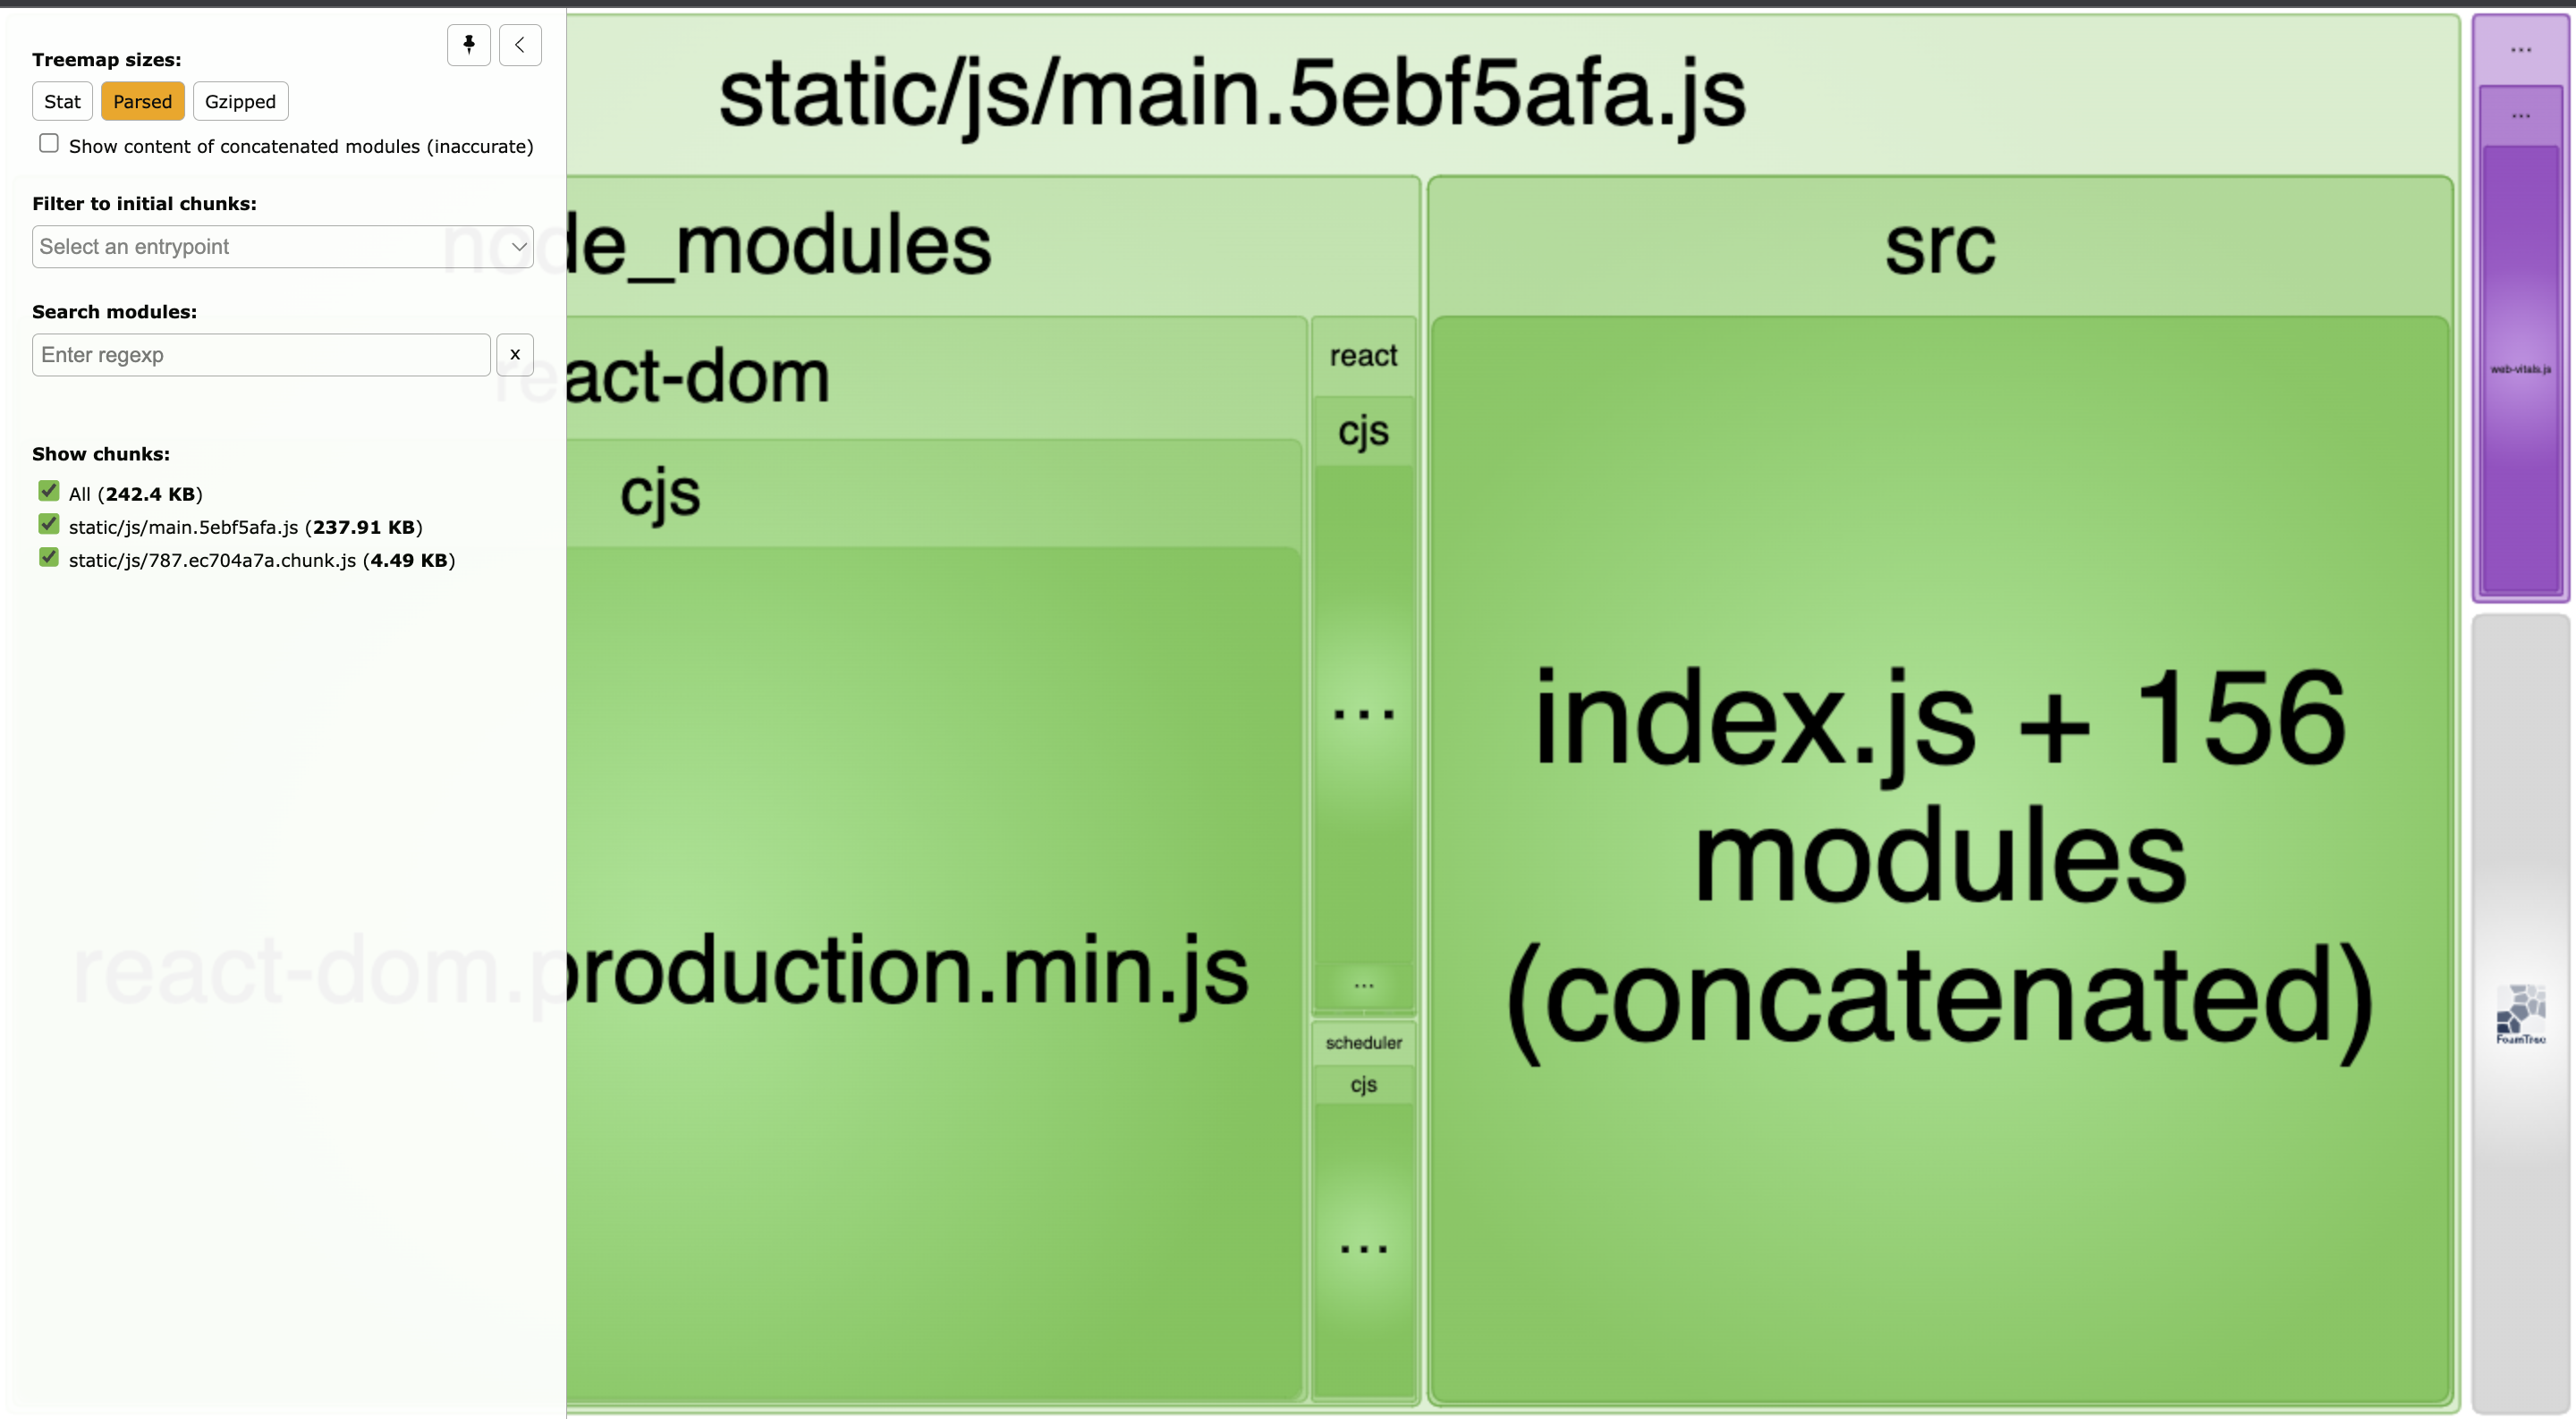
To run the Webpack bundler, run the command npm run analyze or npm craco build. This will automatically launch the Webpack analyzer in your default browser, which will display the bundle size of your application:
Click the upper-left arrow to get insights on the size, as you can see in the examples below.
The stat size of the uncompressed bundle before any minification is 556 KB:
The minified size of your code (parsed) is 242 KB:
The bundle size after compression (gzipped) is 80 KB:
The application code executes the whole MUI package even though you only need particular MUI imports to create the author cards and their elements. This dramatically affects the size of the final bundle.
How the bundle size affects production builds
Development builds include more code that may skew results. However, production builds tend to be minified, with useful names often stripped out to reduce the bundle size. In a production deployment, a gzipped chunk represents how much of the network the production app will use to serve the bundle. The browser controls the unzipping, as the parsed chunk shows how much code the browser will handle.
As it stands, you need 80 KB of network bandwidth to load the bundle on production.
You can verify these statistics by simulating the application and checking the actual network usage.
First, run the Webpack build:
npx serve build
In your browser, open the app at http://localhost:3000. Open your browser's development tools by right-clicking and selecting Inspect in the context menu. Check the Network tab, then reload the app:
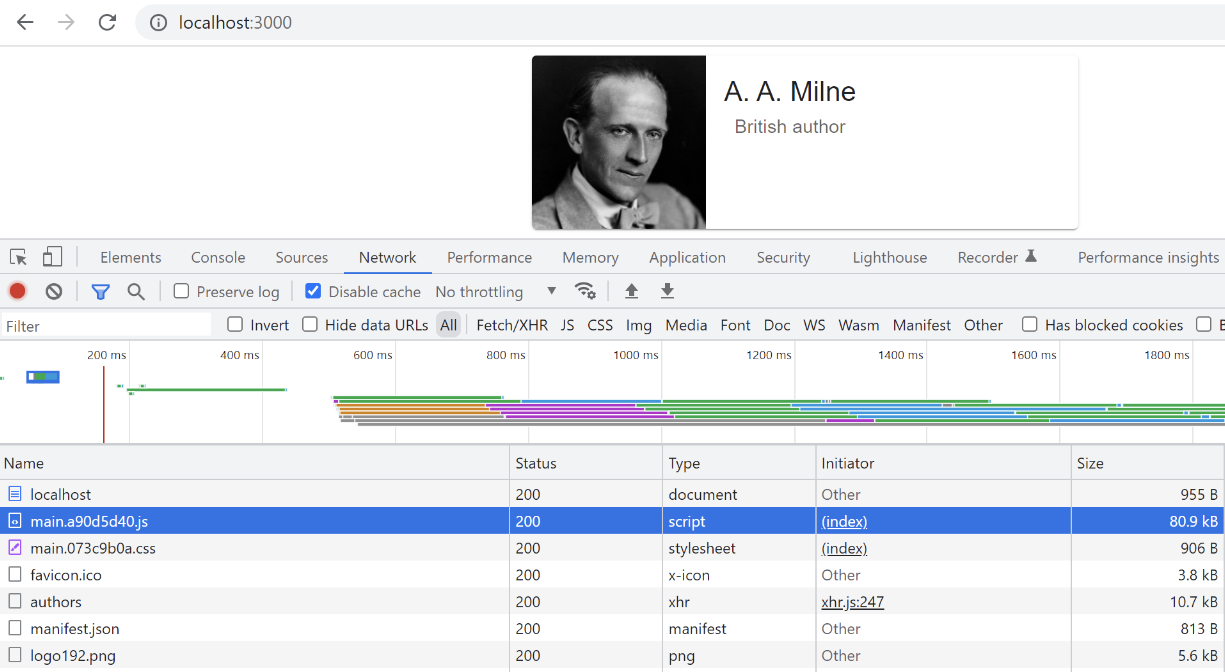
This confirms the application will need 80 KB of network usage to run on production.
Optimizing the bundle
From the above analysis, the application appears to use a considerable amount of bandwidth, which negatively affects user experience. To address this issue, you can optimize the application using the following tips to reduce its size.
Use Fetch instead of Axios
Axios is a popular library for making HTTP requests in JavaScript, but it's not always necessary to use it. For small applications, it may be more efficient to use the built-in fetch API that comes with modern browsers.
In the Authors.js file, removing axios will result in the following code block:
useEffect(() => {
  setLoading(true);
  fetch("https://quotable.io/authors")
    .then((response) => response.json())
    .then((response) => {
      setLoading(false);
      setAuthors(response.results);
    });
}, []);
Only use required imports
When using packages with multiple components, you can reduce the bundle size of your application by importing only the necessary components.
In Authors.js, you can use the default import syntax to import Grid from @mui/material instead of using the traditional CommonJS import:
import Grid from "@mui/material/Grid";
This means you only import the Grid component without code that isn't needed for your application.
In the AuthorCard.js file, you can replace Material UI packages and only import the required MUI elements instead of bundling the entire MUI library:
import Box from "@mui/material/Box";
import Card from "@mui/material/Card";
import CardContent from "@mui/material/CardContent";
import CardMedia from "@mui/material/CardMedia";
import Typography from "@mui/material/Typography";
Create a loading state using Suspense
Displaying large React components often increases the bundle size. Code splitting breaks your code into small chunks that will load more effectively for your users. You can use React Suspense to create small bundle chunks and partially display data until the data finishes loading. This allows you to import the necessary components only when you need them (also known as lazy loading).
Add the following changes to your App.js file to apply lazy loading design patterns and load the authors using Suspense for the Authors component:
import React, { Suspense, useState, useEffect } from "react";

const Authors = React.lazy(() => import("./components/Authors"));

function App() {
  const [showAuthors, setShowAuthors] = useState(false);
  useEffect(() => {
    setShowAuthors(true);
  }, []);

  return (
    <div className="App">
      {showAuthors ? (
        <Suspense fallback={<div>Loading..</div>}>
          <Authors />
        </Suspense>
      ) : (
        <p>Loading</p>
      )}
    </div>
  );
}

export default App;
This code does the following:
- Imports
Suspenseand changes the current way of importing authors to use lazy loading - Defines the state to show the authors and only displays them once the component has been mounted
- Renders the
Authorscomponent to conditionally load the authors list. In this example,Suspensecreates a loading state instructing React what should be rendered while the user waits for the module to import
Checking the optimized bundle size
After you restart the analyzer, your newly created build should drop to around 72 KB (465 KB / 217 KB / 72 KB), a smaller bundle than the previous unoptimized one:
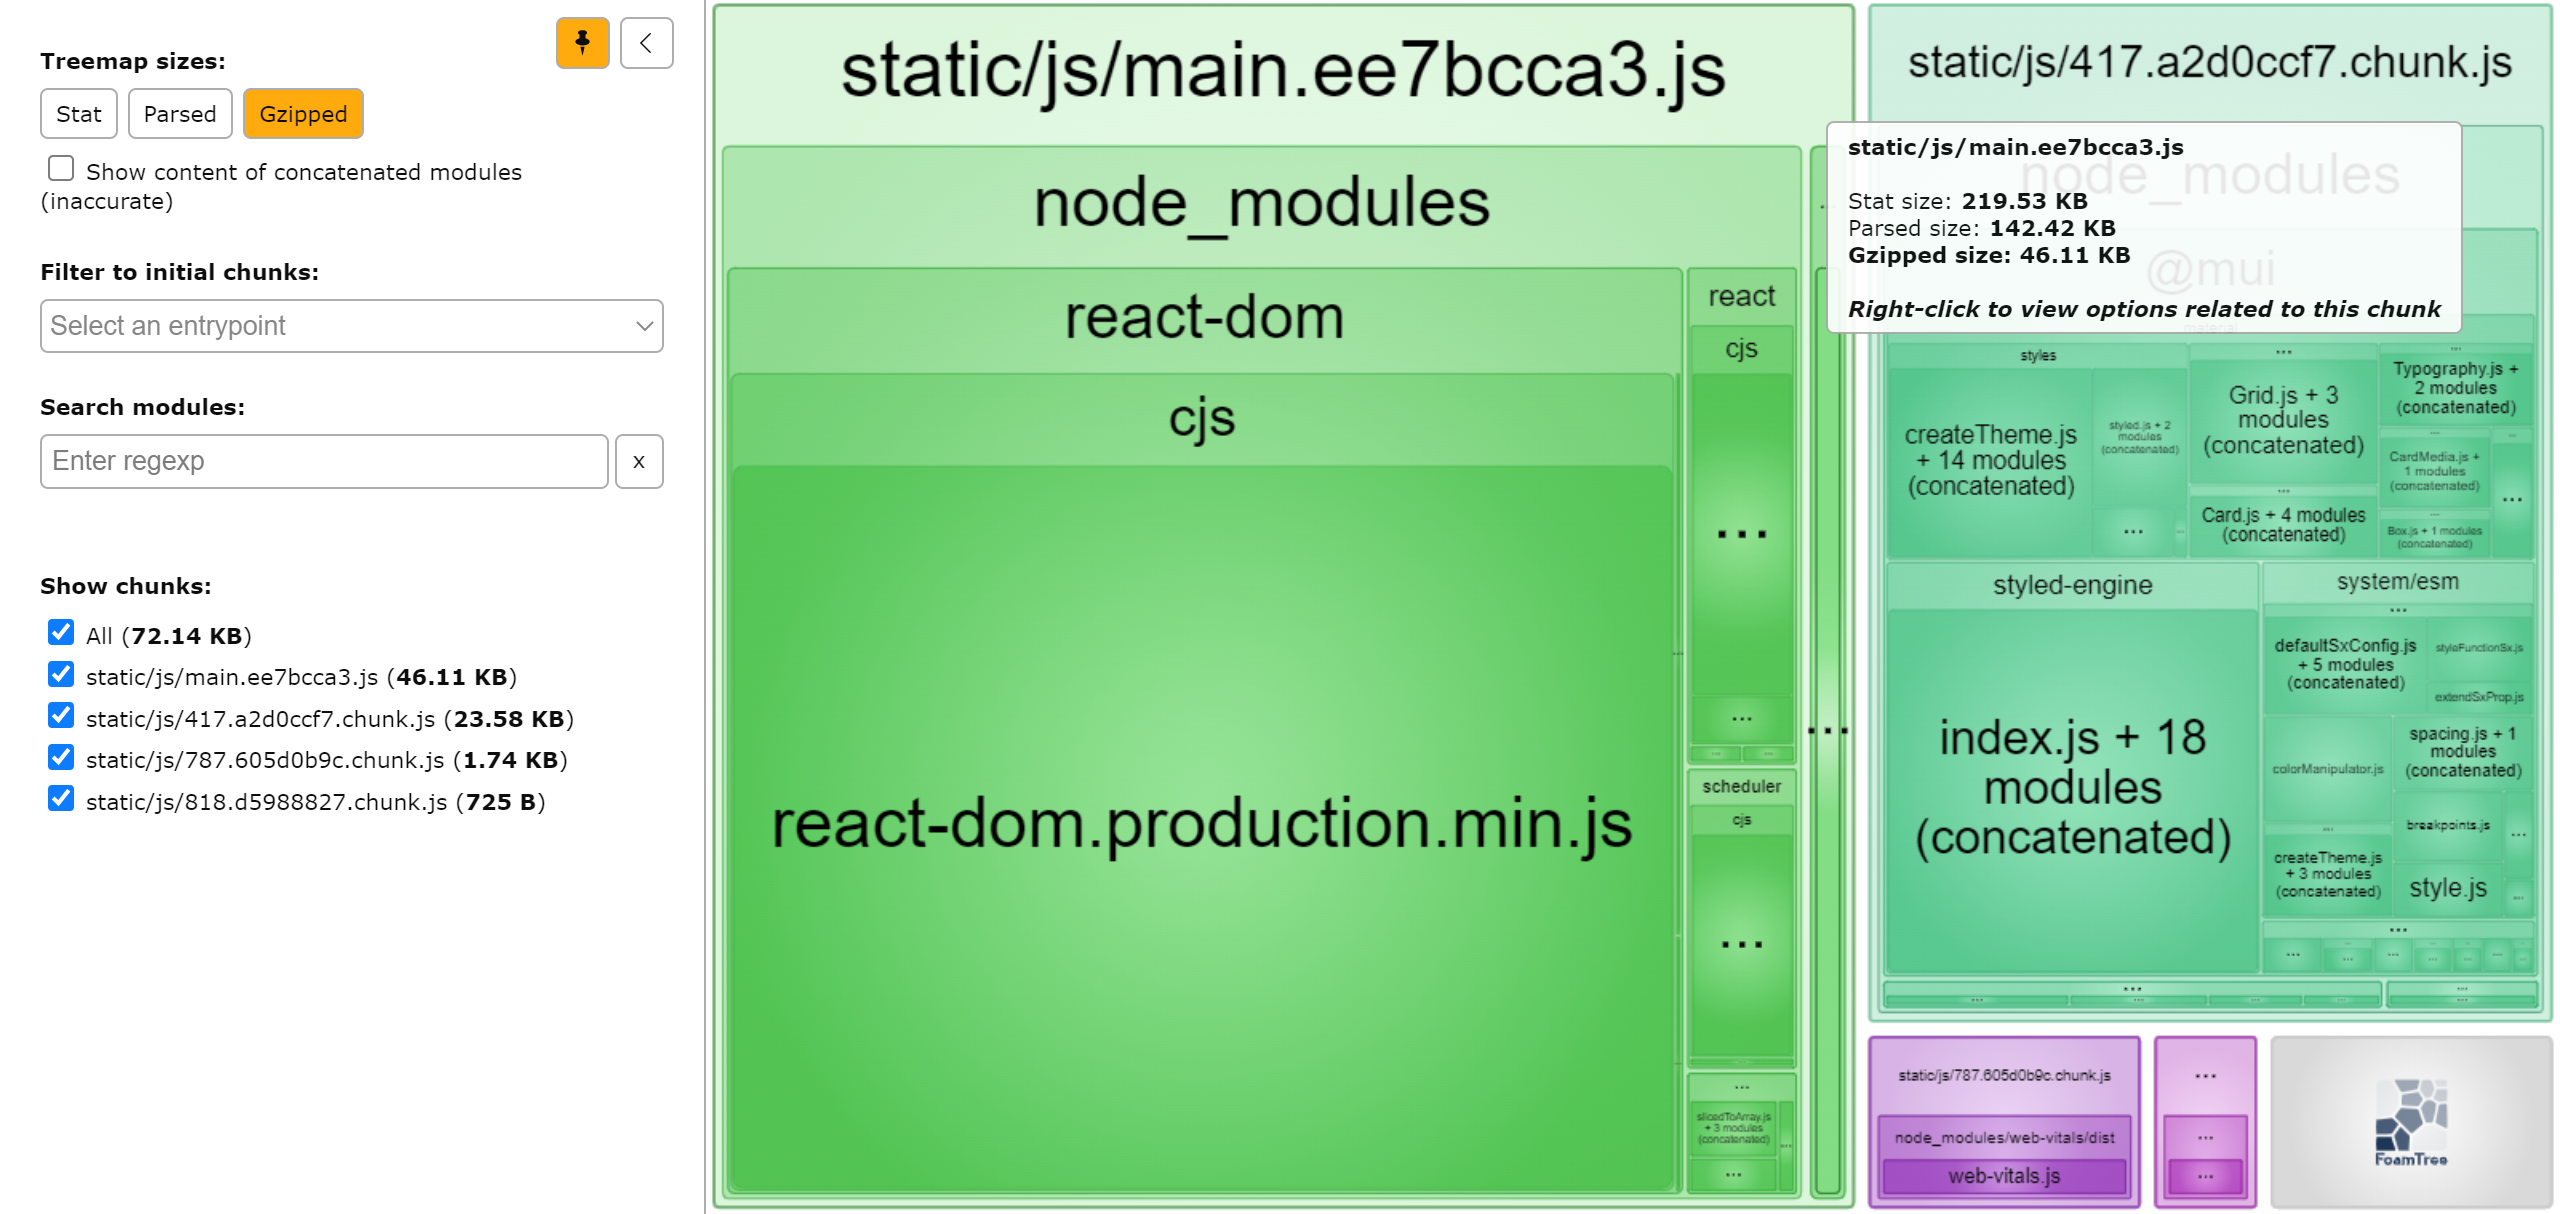
Due to our use of React.lazy the Authors code is now in a separate bundle.
Rerun the new production build using npx serve build. Your network usage should show the following changes:
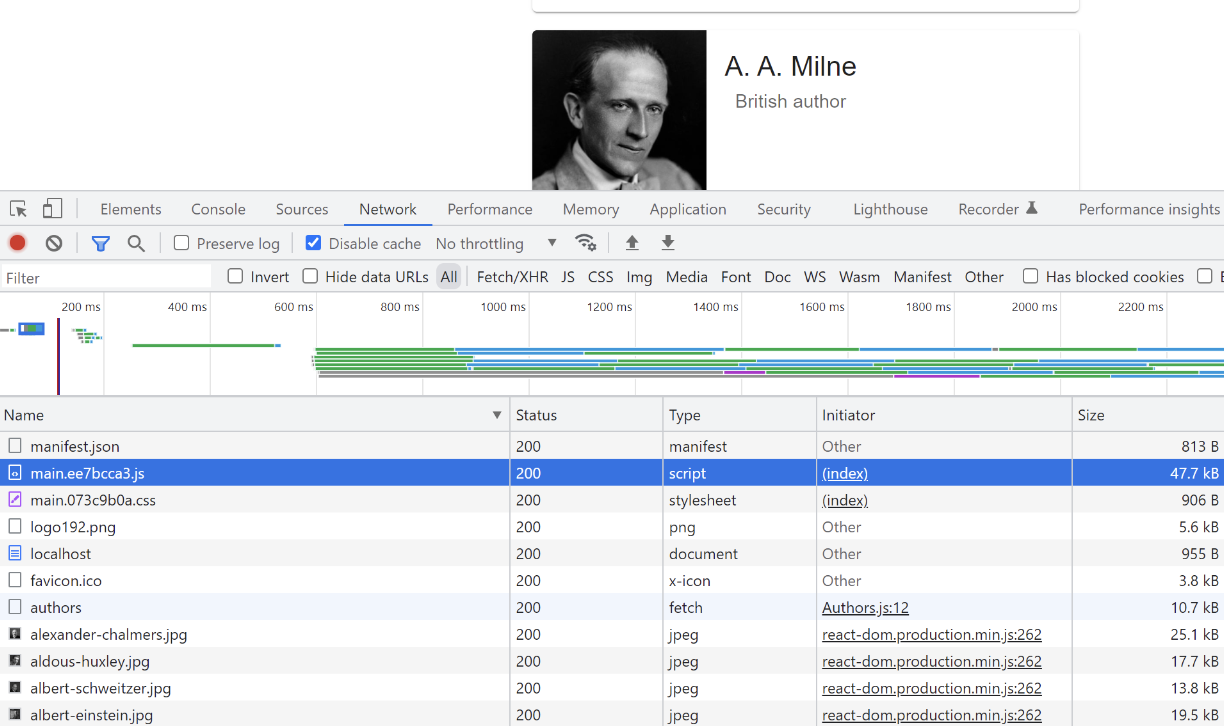
This time, only 47 KB of the chunk is transferred over the network, compared to the previous 80 KB.
Track page speed and JavaScript size
Webpack Bundle Analyzer analyzes your application bundle and generates a treemap that shows you what parts of the code are contributing to bundle size the most. You can use this data to identify potential performance bottlenecks and optimize your code for improved performance.
Techniques like lazy loading and importing only the code you need can help you reduce the size of your application bundle.
Want to monitor the size of your JavaScript application over time? Try DebugBear to continuously track page weight and other web performance metrics.
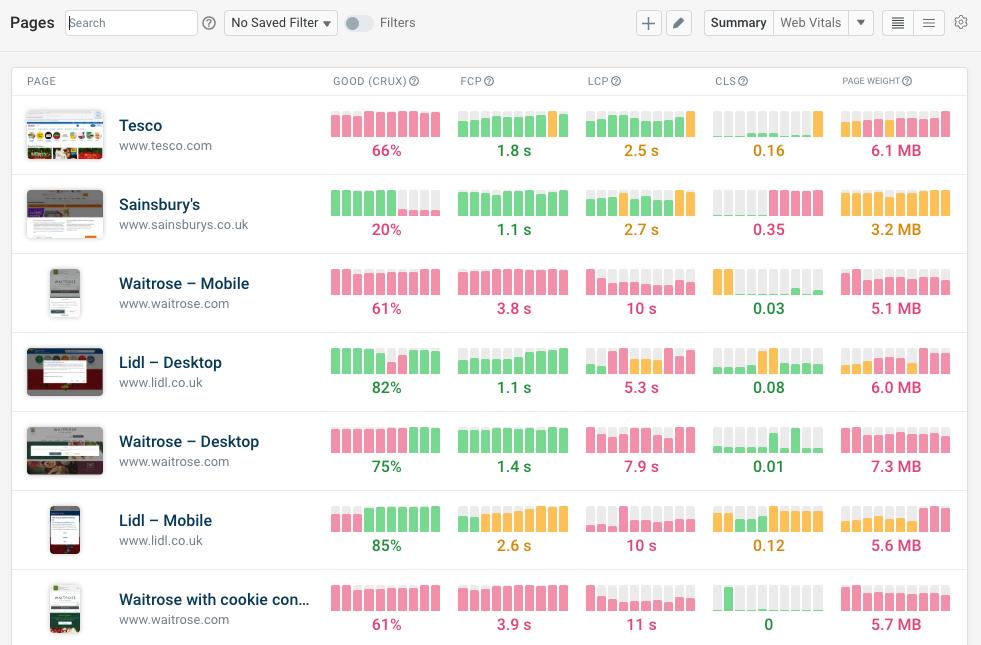
Get alerted to changes in bundle size and identify the exact file that was updated or any new files that are responsible for the increase.
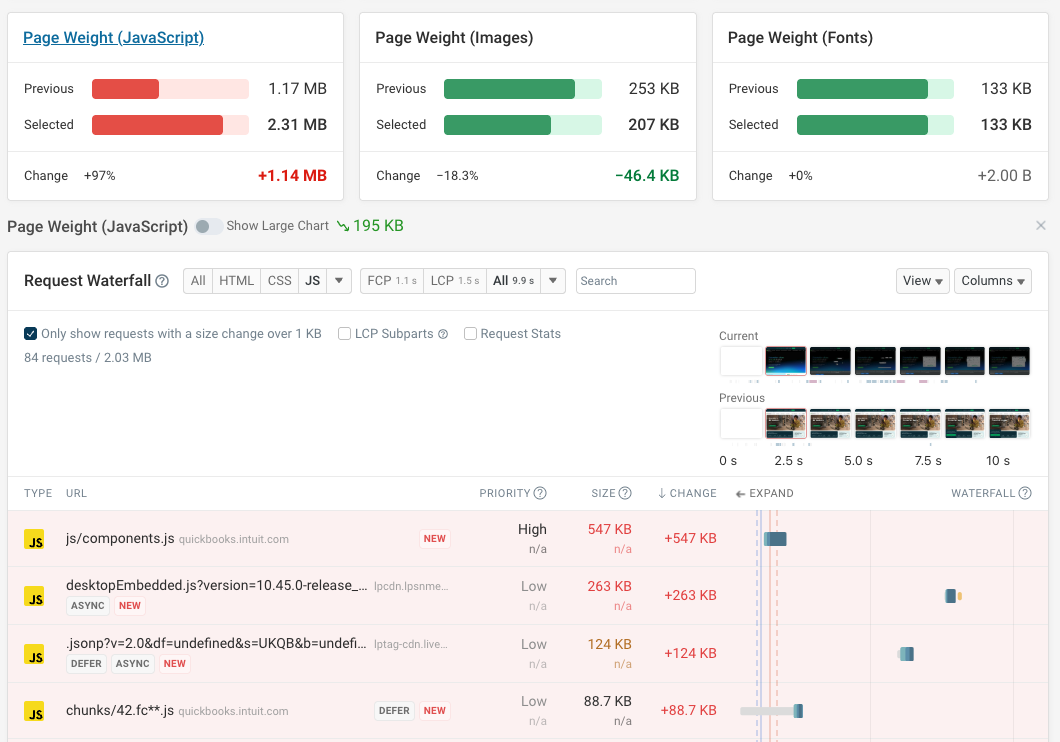
You can also collect real user metrics to see how JavaScript impacts user experience.
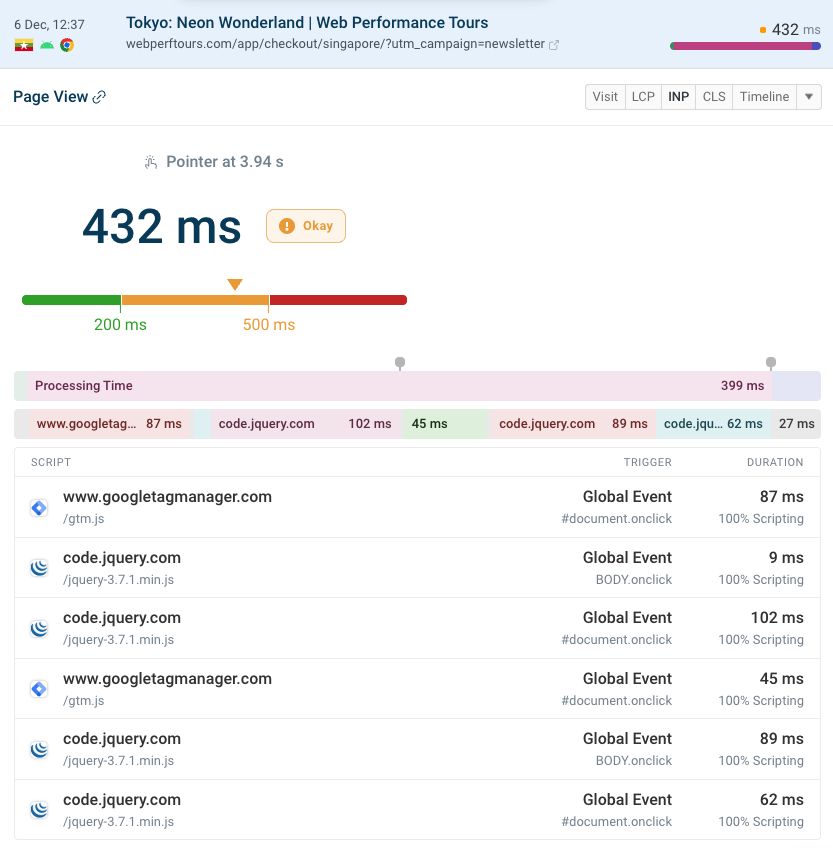
DebugBear measures the Interaction to Next Paint metric and tells you what page elements result in slow responses. You can also identify specific slow scripts based on the Long Animation Frames API.


Monitor Page Speed & Core Web Vitals
DebugBear monitoring includes:
- In-depth Page Speed Reports
- Automated Recommendations
- Real User Analytics Data