Suspense in React has been in development for several years. With the release of React 18, it's now mature enough to be used in production for data fetching and building server-side rendered applications.
In this guide, you'll learn about Suspense and how you can take advantage of it to make your React applications more efficient.
What is Suspense?
Suspense is a React feature that allows developers to display a temporary or "fallback" UI while waiting for data to load. Once the data is loaded, the component that needed the data is rendered.
The Suspense component receives two props, children and fallback. It then renders fallback until all the data required by children is available and children can be rendered.
For the initial release of Suspense in React 16.6, only lazy loading (or code splitting) of React components was supported. At the time of writing, Suspense can be used for data fetching in addition to lazy-loading code.
The API is stable for Suspense-enabled frameworks like Next.js and Remix. However, Suspense's implementation for most data fetching libraries is marked as experimental. Fetching data inside an effect or event handler also will not trigger the Suspense fallback.
When to use Suspense
Suspense can be used in the following scenarios:
- Displaying a fallback while content is loading
- Revealing nested content as it loads
- Showing stale content while fresh content is loading
- Indicating that a transition is happening
Suspense triggers
A Suspense component can only be activated by one of the following triggers:
- Data fetching with Suspense-enabled frameworks like Next.js and Remix
- Lazy loading with
React.lazy
Outside of frameworks or data-fetching libraries, Suspense features are currently limited to code splitting, as in the original implementation. Fetching data inside an effect or event handler also does not trigger the Suspense fallback.
In the following sections, you'll learn how Suspense works by looking at the problem it solves. You'll also learn to use Suspense in standalone client applications and with two popular frameworks, Next.js and Remix.
Prerequisites
You need to be familiar with JavaScript/TypeScript and React to follow this guide. The code snippets for the examples included in this guide are hosted on CodeSandbox and can be found below:
How does Suspense work?
Let's take a look at what problem Suspense is trying to solve and how you can use it to build better React applications.
What problem does Suspense solve?
When building a React client-rendered single-page application (SPA) or server-side rendered (SSR) app, some of your components might depend on data that isn't available when the app is first loaded. To obtain this data, you may have to use asynchronous operations, either through a data request over the network or by lazily importing a file or module.
Loading data at the right time and communicating the current state of different page components to users can be a complex task. To address these challenges, developers usually use one of the following two approaches:
- Requesting data after a component has been rendered, in an effect or lifecycle method
- Requesting data before it's been rendered, usually without the possibility of user interaction until the data is ready
Both of these approaches have their respective drawbacks, including the "waterfalls" problem of sequential requests and slow page load times.
The following image shows the request waterfall of a Next.js application making an API request using the first method mentioned above:
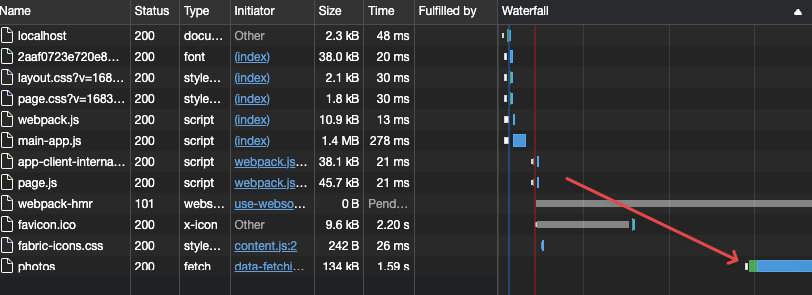
Note that the API request starts after other components are fully loaded in this image.
React 18's introduction of Suspense, along with other concurrent features, introduces a novel approach to handling asynchronous data fetching. This approach involves requesting data as early as possible and rendering components immediately. When components are not yet ready to be rendered, a fallback component is shown instead. React will continue to retry rendering the components as more data comes in and becomes available for use.
Using Suspense components
The following code block demonstrates how to use Suspense:
import { lazy, Suspense } from "react";
import { ComponentB, LoadingOuter, LoadingInner } from "./components";

const ComponentA = lazy(() => import("./ComponentA.js"));
const ComponentC = lazy(() => import("./ComponentC.js"));

export default function App() {
  return (
    <Suspense fallback={<LoadingOuter />}>
      <ComponentA />
      <ComponentB />
      <Suspense fallback={<LoadingInner />}>
        <ComponentC />
      </Suspense>
    </Suspense>
  );
}
Suspense lets you declaratively specify what UI to display when a part of the wrapped tree is not ready to render. So for the code block above:
ComponentAandComponentCare lazy-loaded components using React'slazyAPIComponentBand theLoadingOuterandLoadingInnercomponents are not lazy-loaded
Then, if ComponentA or ComponentB are not yet ready to render, you will only see the LoadingOuter component. When a Suspense boundary is active, even if all but one of the children are ready to be rendered, only the fallback is rendered. By default, the whole tree inside Suspense is treated as a single unit.
Suspense is also conceptually similar to a catch block, with suspending components being "caught" in a Suspense boundary. However, unlike try…catch, the order of precedence for Suspense boundaries is top-down. So, ComponentC will not be rendered if the outer Suspense boundary is active, even though ComponentC is wrapped in its own boundary.
Finally, if ComponentC suspends, then the closest Suspense component with the LoadingInner fallback is activated. This enables developers to create seamless, sequential loading experiences. It eliminates the need for all-or-nothing approaches when dealing with asynchronous operations before or during rendering.
Error handling with Suspense
It's worth mentioning that React's error boundary mechanism also applies to Suspense. So, if a suspended component encounters an error during data retrieval in the component tree, the nearest error boundary will capture and handle the error.
The React documentation includes many examples and use cases for Suspense. These examples don't cover any specific framework or data-fetching library. The examples also make no assumptions about how you're working with React 18, like if you're building client- or server-side rendered apps.
The rest of this guide focuses on using Suspense with Next.js and Remix, which are production-ready frameworks suited for building SSR apps.
Using Suspense for streaming HTML in server-side rendered apps
Suspense in React 18 also enables an important new feature for React SSR apps: streaming HTML. Prior to this release, rendering HTML from server environments looked something like this:
- The server fetches page data and sends the page as HTML to the client
- The client receives the HTML and starts to download the required JavaScript code
- When React and the application code are available, hydration begins
There are a couple of problems with this workflow, but the summary is as follows:
- You have to fetch all the data required by a page or component before you can render anything
- You have to load everything on the client before React can begin hydration
- Hydration cannot be interrupted once it's started, but your page has to be fully hydrated before users can interact with it
With the renderToPipeableStream API and Suspense, you can wrap a section of your page or component with Suspense. This allows you to stream available HTML content while waiting for other data to load.
This change lets React know not to wait for the data in the wrapped Suspense block. It can then stream the rest of the component HTML, along with the specified fallback component, to the client. When the suspended component is ready to render, React will send additional HTML via the same stream. This will be accompanied by inline JavaScript code containing instructions to insert the HTML in the right place in the DOM.
As of React 18.2, this feature is limited to frameworks that support React 18 and have been updated to work with streaming SSR. You'll next look at how Next.js and Remix integrate the streaming SSR and Suspense APIs.
Next.js
Next.js is a React framework for building full-stack applications that are statically generated or server-side rendered. Suspense can be used with the app directory, which was first introduced in Next.js version 13. If you're on Next.js 12 or you're still using the pages directory, you can follow this guide to migrate to using app.
Next.js makes use of React Server Components (RSC), and all components inside the app directory are RSC by default. Read the official documentation to learn more about Server Components in Next.js 13. Note that RSC and the app directory are still in beta.
To take advantage of streaming in your Next.js app, you can wrap any component containing asynchronous logic in a Suspense boundary. The following code example wraps a component, DataFetchingExample, inside a Suspense boundary. It displays the Loading component as a fallback until the DataFetchingExample component is ready to render:
// app/page.tsx
import { Suspense } from "react";
import DataFetchingExample from "../components/data-fetching";
import Loading from "../components/loading";
import styles from "../styles/Home.module.css";

export default function Home() {
  return (
    <>
      <main className={styles.main}>
        <Suspense fallback={<Loading />}>
          {/* @ts-expect-error Server Component */}
          <DataFetchingExample />
        </Suspense>
      </main>
    </>
  );
}
The DataFetchingExample component fetches and renders data from an external API, JSONPlaceholder. Because the component is a server component, it's defined and exported as an async component instead of a functional component:
// components/data-fetching.tsx
export default async function DataFetchingExample() {
  // delay added to demo a (very) slow loading request
  await new Promise((resolve) => setTimeout(resolve, 5000));
  const response = await fetch(
    "https://jsonplaceholder.typicode.com/comments",
    {
      // disable caching
      cache: "no-store",
    },
  );

  if (!response || response.status !== 200) {
    console.error("Failed to fetch data");
  }

  const data = await response.json();
  const firstPost = data[0];
  return (
    <div>
      <p>Todo: {firstPost?.title}</p>
    </div>
  );
}
This means that you can use async and await syntax at the top level of your component to access asynchronous data. Your component's UI will also only be rendered when the data is ready. This example includes some mechanisms to extend the length of the async operation to better demonstrate the benefits of Suspense and the React streaming API:
- The data set being read is large (an array with 5,000 records)
- There's a five-second artificial delay before the data-fetching request is made
The CodeSandbox for this example can be found here.
Remix
Remix is a full-stack web framework for React developed by the creators of React Router. Remix uses the defer response utility and the <Await> component or useAsyncValue hook to provide streaming/Suspense compatibility.
As with Next.js, you would need to set up your application to work with the new streaming API. New Remix projects (created with the create-remix command line interface) are already set up this way. The official Remix documentation provides more detailed information on enabling streaming in your existing React 18 app.
If you created a new Remix application using the create-remix tool, open up the index.tsx file located in the app/routes directory. Replace the existing code in that file with the following:
import { defer } from "@remix-run/node";
import { Await, useLoaderData } from "@remix-run/react";
import { Suspense } from "react";
import DataFetchingExample from "~/components/data-fetching";
import Loading from "~/components/Loading";

export function loader() {
  const fetchPosts = async () => {
    await new Promise((resolve) => setTimeout(resolve, Number(5000)));
    const response = await fetch(
      "https://jsonplaceholder.typicode.com/photos",
      {
        // disable cache
        cache: "no-store",
      }
    );

    if (!response || response.status !== 200) {
      console.error("Failed to fetch data");
    }

    const data = await response.json();
    const post = data[0];
    return post;
  };

  const promiseRequest = fetchPosts();

  return defer({
    post: promiseRequest,
  });
}

export default function Index() {
  const data = useLoaderData<typeof loader>();
  return (
    <div style={{ fontFamily: "system-ui, sans-serif", lineHeight: "1.4" }}>
      <h1>Welcome to Remix in CodeSandbox</h1>

      <Suspense fallback={<Loading />}>
        <Await resolve={data.post} errorElement={<p>Could not fetch photos</p>}>
          {(post) => <DataFetchingExample post={post} />}
        </Await>
      </Suspense>
    </div>
  );
}
It may not look like it at first glance, but the code above is similar to the Next.js example earlier. The main difference is that you're taking advantage of the Remix loader API instead of a Server Component to start data fetching. The defer utility allows you to transport promises to your UI components. The <Await> component resolves promises obtained from your route loader function.
In the code example, the fetchPosts function fetches photo posts from the JSONPlaceholder API and returns a single record. The logic is the same as in the Next.js example. This function is invoked, and the reference is passed to the defer function call.
In your component code, you grab the deferred value using the useLoaderData hook. You then pass this value to the <Await> component's resolve prop. Finally, once the promise is resolved, you access the value as a render function.
Note that the standard Remix application comes with a preset time-out period. If the asynchronous operation remains incomplete after the time-out, the server will terminate the rendering process. To configure the value for this time-out, open the server.entry.tsx file located in the app directory and change the value of the ABORT_DELAY variable.
You'll also need to change the DataFetchingExample component to a normal React component and pass the resolved data as a prop to the component:
// components/data-fetching.tsx
type PageProps = {
  post: {
    albumId: number,
    id: number,
    title: string,
    url: string,
    thumbnailUrl: string,
  },
};

export default function DataFetchingExample({ post }: PageProps) {
  return (
    <div>
      <p>Todo: {post?.title}</p>
    </div>
  );
}
The CodeSandbox for this project can be found here.
Monitoring React application performance
To measure the real-world impact of your optimizations, you can use DebugBear web performance monitoring.
Track key metrics like Largest Contentful Paint (LCP) and Interaction to Next Paint (INP) to see how your work impacts real user experience.
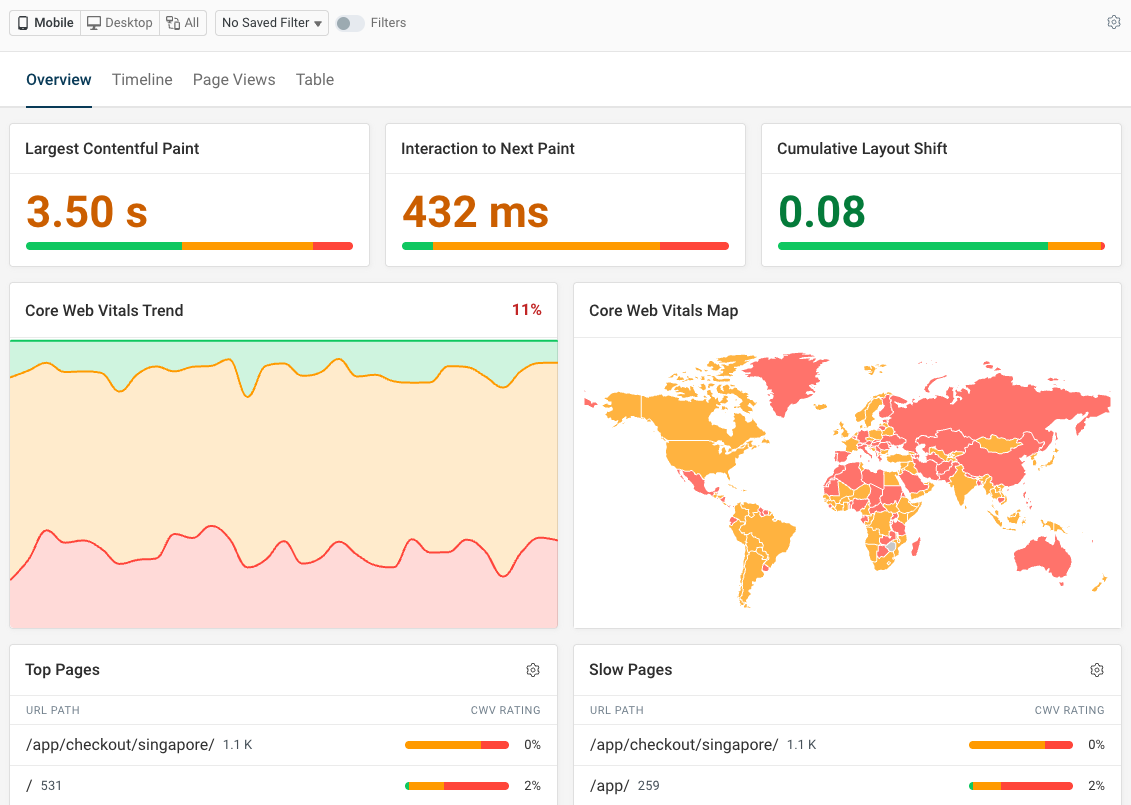
You can also use synthetic monitoring to run regular performance tests and catch regressions before they affect users.
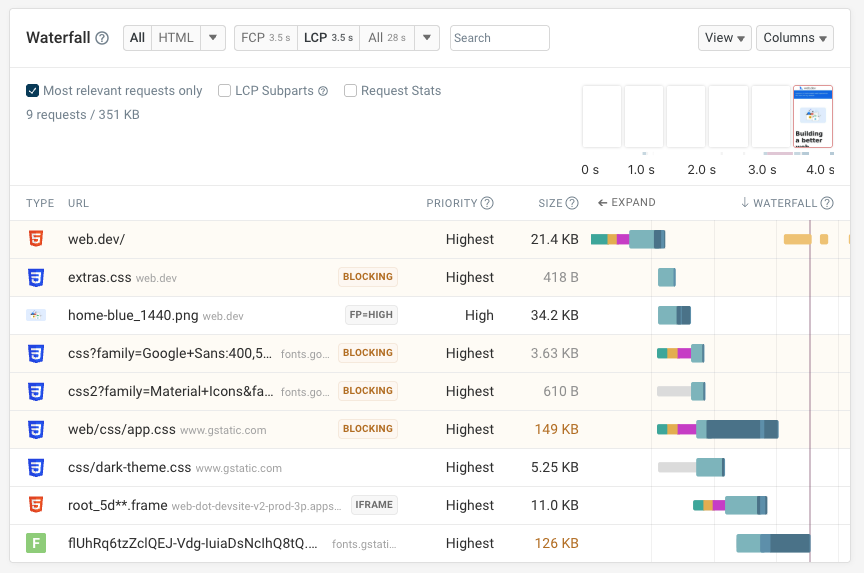
The request waterfall view lets you visualize data and resource loading and see how it correlates with key performance metrics and what visitors see on the screen.
Sign up for a free 14-day trial to monitor your React app's performance.


Monitor Page Speed & Core Web Vitals
DebugBear monitoring includes:
- In-depth Page Speed Reports
- Automated Recommendations
- Real User Analytics Data