
"Why are my pages loading so slowly?" is a question many of us frequently ask. Slow loading websites are one of the biggest issues on the web that hurts user experience, bounce and conversion rates, and SEO.
Luckily, there are many techniques you can use to fix slow loading websites, including improving the hosting environment, implementing caching, optimizing images and code, and others.
In this article, we'll look into how to make slow loading websites faster by following some hands-on recommendations.
Run A Free Page Speed Test
Test Your Website:
- Automated Recommendations
- Detailed Request Waterfall
- Web Vitals Assessment
1. Choose a Fast Web Host
As site speed starts with fast hosting, evaluating how well your web host performs is an essential step to make slow loading websites faster.
The best way to assess the performance of your hosting provider is to check your Time To First Byte (TTFB) results.
Time To First Byte shows how fast your server responds to user requests by measuring how much time passes between the network request sent by the browser and the arrival of the first byte of the web page.
TTFB is one of Google’s Web Vitals, with pre-defined passing and failing thresholds (800 and 1800 milliseconds), so it’s easy to assess your results — just run a website audit with a tool such as Lighthouse (integrated into Chrome DevTools), PageSpeed Insights, or DebugBear.
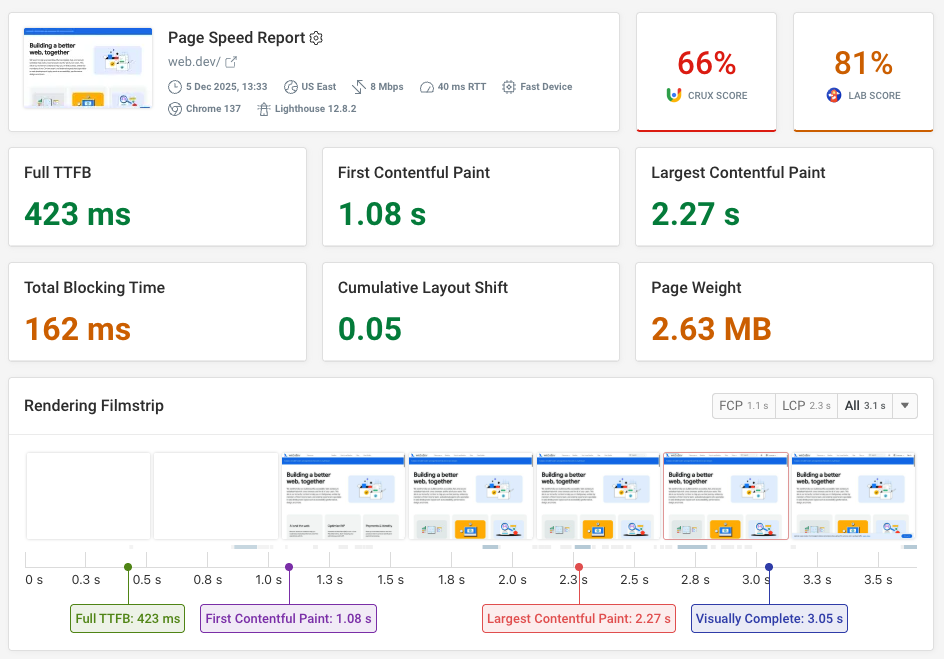
As each web page has a mobile and desktop TTFB score, it’s recommended that you check both. For example, in the screenshot below, you can see the mobile TTFB result of a free DebugBear speed test:

If you get consistently poor TTFB results, it’s worth improving your hosting setup, which you can do by:
- either upgrading your hosting plan to get access to more resources, e.g. bandwidth, memory, CPU, etc.
- or migrating to a new web host that provides additional services that can make slow loading websites faster, such as integration with a content delivery network (CDN), GZIP or Brotli compression, support for HTTP/3, or server caching (we’ll discuss these techniques below, in Steps 2 – 5, in detail)
2. Load Your Static Assets from a CDN
CDN stands for Content Delivery Network, which is a network of geographically distributed servers. Using a CDN can make slow loading websites faster as you can serve your static assets, such as CSS and JavaScript files and images, to each user from an edge server that is physically the closest to them.
Some examples of the best content delivery networks are Cloudflare, KeyCDN, Fastly, Akamai, and Bunny.net. Big cloud providers such as Google Cloud, Amazon, and Azure also have their own built-in CDNs.
You can integrate your website with a content delivery network in one of the following ways:
- signing up for a CDN account and setting it up for your site
- signing up for a web hosting plan that includes automatic CDN integration
- using a CDN integration plugin or module (usually available for content management systems, e.g. Jetpack CDN and CDN Enabler for WordPress or the CDN module for Drupal)
3. Use GZIP or Brotli Compression
GZIP and Brotli are HTTP text compression algorithms that reduce the size of your text files (e.g. HTML, CSS, JavaScript, etc.).
While Brotli's compression ratio is a bit higher (you can test the difference using Paul Calvano’s GZIP/Brotli compression level estimator), it’s supported by slightly fewer browsers than GZIP (currently 100% vs 97.52% globally).
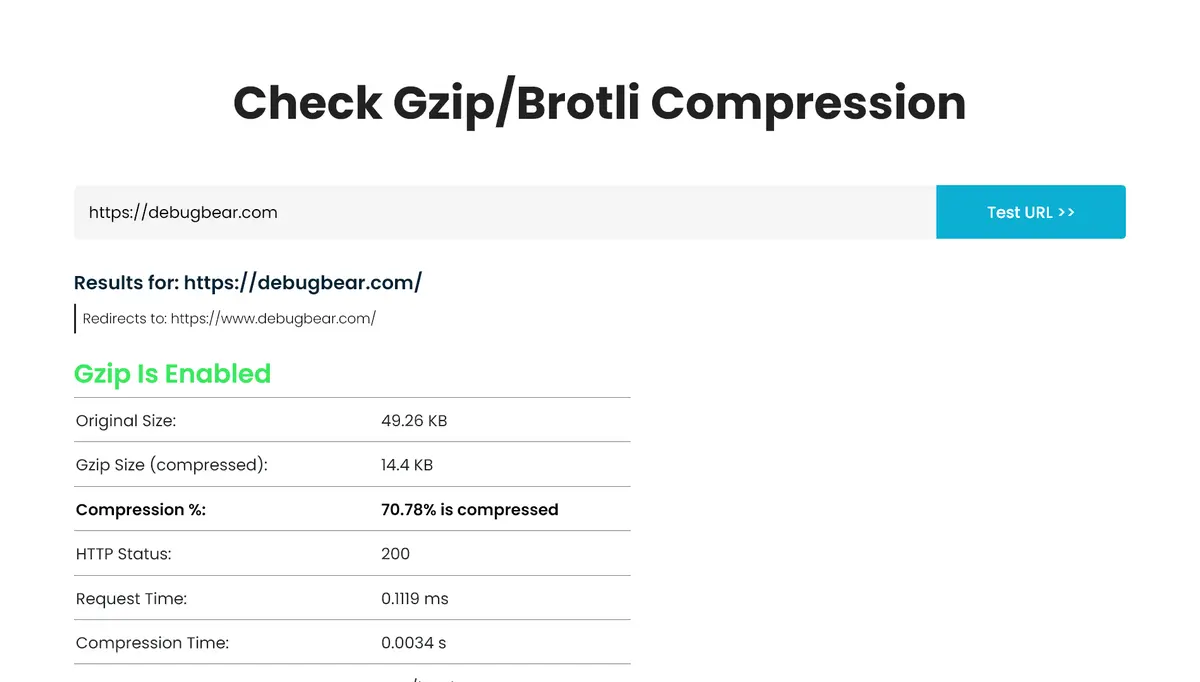
To use GZIP or Brotli compression, you need to enable it on your server. Depending on your web host, you may already use it on your website. You can check it using a tool such as GiftOfSpeed’s GZIP/Brotli compression tester. For example, here are our results for the DebugBear.com website:
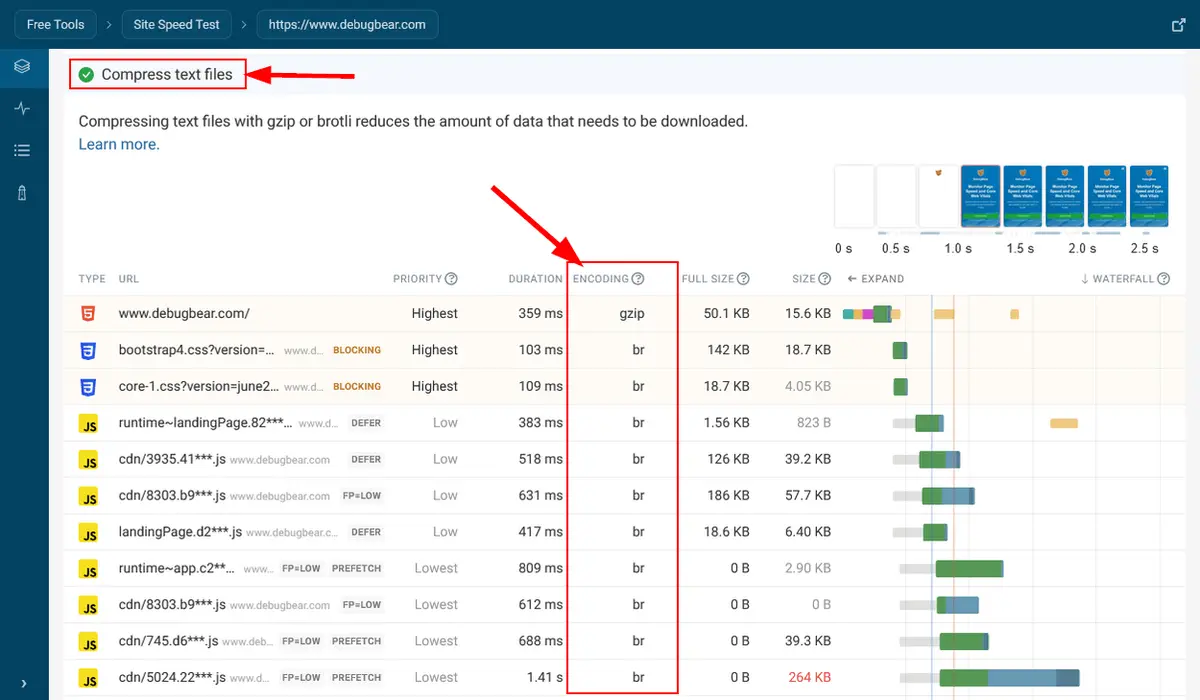
You can also use DebugBear’s Free Website Speed Test tool to see the compression method of each of your text files. To do so, run a free website test, then scroll down to the Recommendations section and open the Compress text files tab:
If your host uses neither GZIP nor Brotli text compression, you can still get access to it by using a CDN (see above) as almost all of them come with support for GZIP and/or Brotli compression. For example, Cloudflare, Fastly, and Akamai support both algorithms. They use Brotli by default but fall back to GZIP if the user’s browser doesn’t support Brotli.
Some caching plugins for content management systems, such as WP Rocket and WP Fastest Cache for WordPress, also come with the option to enable GZIP or Brotli compression on your server.
4. Use a Modern Version of the HTTP Protocol
HTTP (Hypertext Transfer Protocol) is a network protocol responsible for the communication between the client application (e.g. the user’s browser, search engine and social media bots, etc.) and your server. Currently, it has three versions in use: HTTP/1.1, HTTP/2, and HTTP/3. The two latter ones are often referred to as the modern versions of the HTTP protocol.
While HTTP/2 has multiple advantages over HTTP/1.1, such as header compression and stream multiplexing, they both run on top of TCP (Transport Control Protocol), an older transport protocol.
HTTP/3, on the other hand, implements a new protocol architecture based on QUIC, a next-generation transport protocol, which comes with head-of-line blocking removal, an improved cryptographic handshake, a new field compression format (QPACK), and other performance benefits. Using HTTP/3 to transfer data from the server to the client can make slow loading websites faster for most users.
That said, not all browsers support HTTP/3 (if the client doesn’t support HTTP/3, the connection falls back to HTTP/2 or HTTP/1.1), and the performance gains of QUIC also depend on the implementation. Even though it likely won’t make slow loading websites faster for all of your users, it’s still worth enabling HTTP/3 on your server. As for HTTP/2, adding support for it is a must-have these days to provide your visitors with a good loading experience.
To check whether your web host uses HTTP/2 or HTTP/3, you can run:
- an HTTP/2 test using KeyCDN’s HTTP/2 Test tool
- an HTTP/3 test using a tool such as LiteSpeed’s HTTP/3 Check.
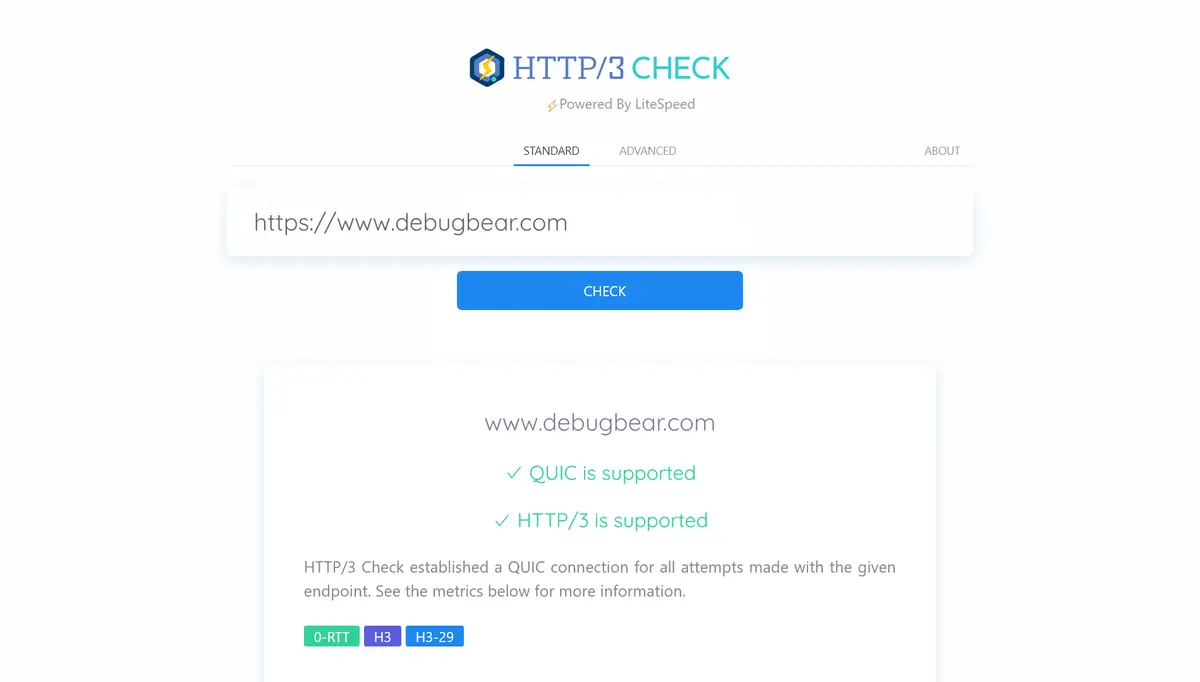
For example, here’s the HTTP/3 test result for the DebugBear.com website:
To enable HTTP/2 and/or HTTP/3 for your website, you can:
- use a content delivery network that comes with HTTP/3 support, such as Cloudflare, Akamai, Fastly, etc., but falls back to HTTP/2 if the user’s browser doesn’t support HTTP/3
- move to a hosting plan that supports HTTP/2 and, if possible, also HTTP/3 (the latter plans typically make use of the HTTP/3 support of the CDN they integrate with)
- for HTTP/3 support, add a QUIC or HTTP/3 implementation to your application (requires coding knowledge)
5. Implement Caching on Both the Client and Server
Caching is a web performance optimization technique that stores copies of previously or frequently accessed files in a temporary location. It can make slow loading websites faster because cached files can be served faster, as they are already generated and/or downloaded.
Technically, you can implement caching at any location where web files are processed, including:
- Browser caching – implemented in the browser of website visitors who visit a web page more than once; the browser cache is located on the user’s hard drive
- Server caching – implemented on the server; the cache can be located on the hard drive, in the RAM (random access memory), in the cache memory on the CPU, or in an in-memory NoSQL data store (such as Memcached or Redis)
- CDN caching – implemented on the edge servers of content delivery networks; stores frequently accessed static assets such as HTML, CSS, and JavaScript files and images; some CDNs let you implement full-page caching
- API caching – implemented on the client or server; stores commonly requested API responses made with the same parameters (to learn more about API caching, see Isla Sibanda’s article on the Stoplight Blog)
- Database caching – stores commonly requested database queries; the cache is located on the database or application server (to learn more about database caching, check out Alex Emerich’s article in Prisma’s Data Guide)
- Other caching – e.g. the browser’s b/f (back/forward) cache or DNS caching
As the list above shows, caching is a complex topic, and the techniques you can implement depend on your application architecture.
Your web host and CDN provider most likely already use some form of caching, but improving your caching strategy, e.g. installing a caching plugin, can still help you make slow loading websites faster.
To learn more about caching, check out our article on browser vs server caching which summarizes how a caching system between the client and server typically works and includes many practical tips as well.
6. Reduce the Number and Impact of Third-Party Resources
Third-party resources are files that the browser needs to download from external servers, such as ads, analytics scripts, social media buttons or widgets, etc.
Requesting and downloading a third-party resource usually takes more time than requesting and downloading the same file from your own server because the browser needs to establish a new connection, which involves:
- one round-trip to the domain name server
- one to four round-trips to set up the HTTP connection (depending on your network protocol stack)
You can make slow loading websites faster by reviewing your third-party resources and then, if possible, either eliminating them or reducing their impact on site speed.
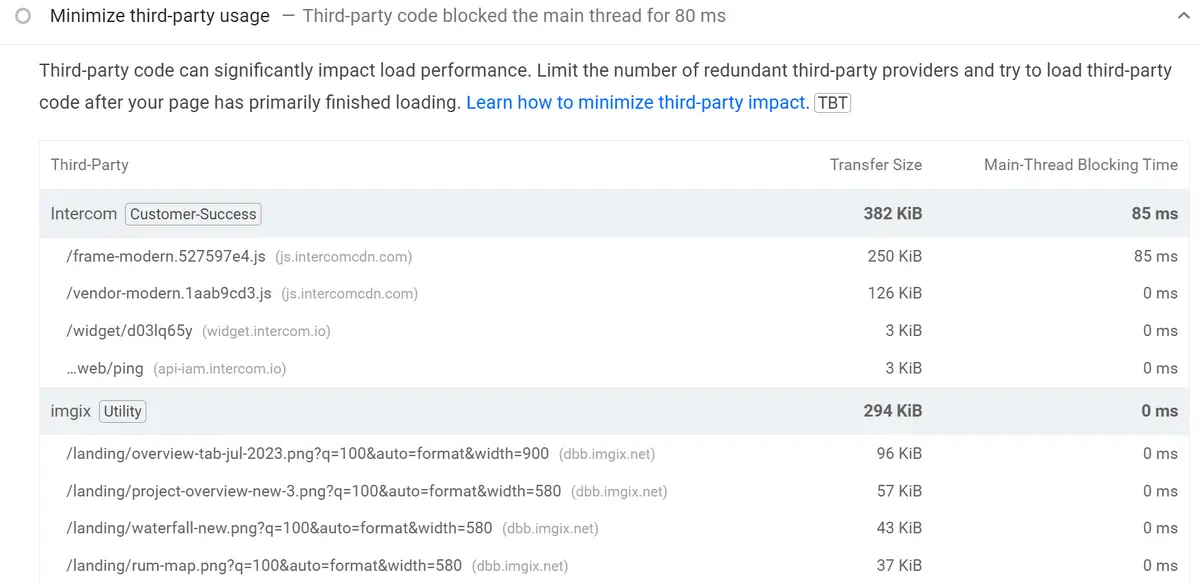
To detect your third-party resources, you can run a Lighthouse (LH) audit (using Lighthouse or PageSpeed Insights), which returns a list of your third-party files under the 'Minimize third-party usage' tab.
Here’s an example from the LH audit of our website:
You can reduce the number of your third-party resources by:
- Removing the resources you don’t need – If you don’t really need a third-party resource, library, or widget that you use on your website, consider removing it.
- Loading third-party resources locally (a.k.a. self-hosting them) – Sometimes, there’s a way to move a third-party resource from an external server/CDN to your own server/CDN, e.g. you can self-host Google Fonts, as downloading Google Fonts from Google’s CDNs requires two extra connections.
- Using your own domain for CDN content – If you use a content delivery network, serve the assets from your own domain instead of the third-party domain of the CDN provider (most CDNs, including image CDNs, allow you to integrate with your own domain).
If you can’t remove or self-host a third-party resource, you can still reduce its negative impact on site speed in the following ways:
- Use resource hints – Resource hints, such as prefetch and preconnect hints, allow the browser to download files (prefetch) or connect to external servers (preconnect) in the background to prepare resources the user will likely need on the next page. You can add resource hints to the
<link>HTML tag. - Load third-party scripts asynchronously or defer them – You can add the
asyncordeferattribute to<script>tags to make JavaScript files download either in the background, independently from other page elements (async) or just before the end of the page rendering process (defer). - Lazy load out-of-view resources – If a third-party resource, such as an iframe widget or embed, is not in the viewport, you can lazy load it using the
loading=”lazy”attribute (which can be added to the<img>and<iframe>elements) so that the browser only starts downloading the file before it’s about to appear in the viewport (if the user doesn’t scroll to or open that part of the web page, the browser won't download the third-party resource). - Load third-party resources conditionally – If you don’t need a resource under some media conditions (e.g. device width, height, orientation, resolution, color scheme, etc.), you can use the
mediaattribute (another attribute of the<link>tag) to defer them when the conditions don’t apply.
7. Remove Unused CSS and JavaScript
After reducing the number and impact of third-party resources, your website may still include CSS and JavaScript code it doesn’t need.
This unused code can come from:
-
third-party libraries or frameworks that add useful features to your site, but at the same time, they also include features you don’t use
-
a JavaScript dependency that you added at some time in the past but don’t use anymore
-
your custom CSS or JavaScript files that include code that:
-
is only used on other pages/parts of your website
-
belong to older features you don’t provide anymore
-
is meant to support devices, browsers, or experimental features you don’t need to support anymore
-
-
etc.
You can make slow loading websites faster by detecting unused CSS and JavaScript and removing as much of it as you can.
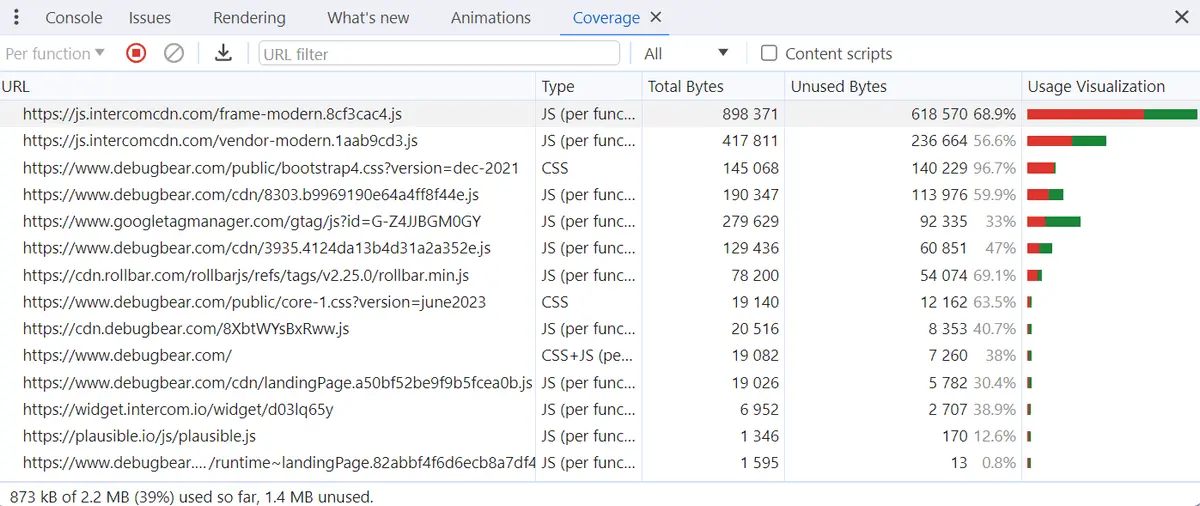
To detect unused CSS and JavaScript on a web page, you can use the Coverage tab of Chrome DevTools (you can find it by clicking the three dots icon in the top-right corner of Chrome DevTools, then selecting More tools > Coverage).
When you reload the page, Chrome DevTools will show all the CSS and JavaScript files that the browser has downloaded and visualize the ratio of unused vs used code (in red vs green):
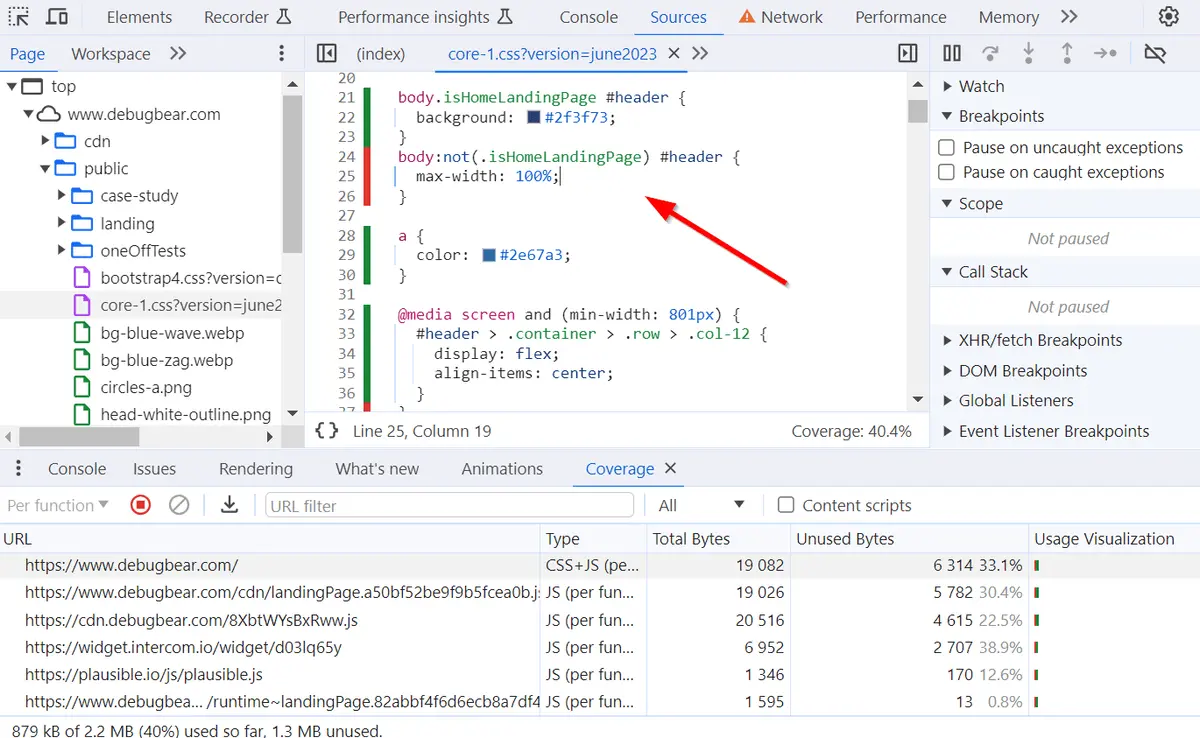
You can also open each file in a line-by-line view by clicking the colored bars in the Usage Visualization column.
The detailed code view will help you inspect your unused CSS and JavaScript code:
Removing all the unused CSS and JavaScript from your website is usually not possible. For example, if you use third-party libraries such as Bootstrap or Intercom, you won’t want to refactor the belonging third-party code.
Also note that the Coverage tab shows used vs unused code in real time, so if you keep interacting with the page or change the viewport, the results may (slightly) change. If you want to use the Coverage tab, you’ll need to be careful and test the site under different conditions.
That said, analyzing unused CSS and JavaScript is still worth the time and effort as it can give you new ideas about how to make slow loading websites faster. For example, it can indicate that you need to refactor your first-party CSS code.
As an alternative or in addition to the manual method discussed above, you can also use a tool such as:
- PurgeCSS or UnCSS to remove unused rules from CSS files
- Unimported or Knip to detect unused JavaScript files and dependencies
- a module bundler to split your code into smaller chunks and eliminate dead code (see the next section)
Check out our guide specifically for reducing unused JavaScript on your website.
8. Minify and Bundle Your Resources
Minifying and bundling frontend resources is a popular code optimization technique that can help make slow loading websites faster.
Code minifiers reduce the size of code files by removing unnecessary characters, such as whitespace, comments, commas, and semicolons where they can be omitted, etc. Minified files can be transferred over the network and downloaded by the browser faster. There are many free code minification tools available online, such as cssnano, JSCompress, Minifier.org, and others.
Using a module bundler, such as Webpack, Parcel, or Rollup, is a more advanced and effective way to make slow loading websites faster. However, they come with a steeper learning curve than plain code minifiers unless you only use their default (zero config) setup without any customizations (which also does make slow loading websites faster, just not as much as well-configured custom bundles).
In addition to code minification and bundling (i.e. packaging first- and third-party code into one file for deployment), module bundlers also come with advanced web performance optimization features such as:
- code splitting – lets you break up your code into smaller bundles that you can load on demand
- dead code elimination – identifies and removes unreachable code that the browser would never execute
- tree shaking (live code inclusion) – a more efficient form of dead code elimination; the bundler identifies all the relevant code at the entry point and ‘shakes’ the dead code off the syntax tree before adding it to the bundle
- scope hoisting – concatenates different JavaScript modules into a single scope instead of wrapping each in a separate function
- …etc.
Most module bundlers have a plugin ecosystem, too, that can help you implement common tasks such as linting, reporting, creating sitemaps, obfuscating entry files, performing various conversions, and others.
9. Optimize Your Images
Images frequently take up a huge part of the total page size, therefore optimizing them can make slow loading websites significantly faster.
As image optimization is a key aspect of web performance, we have separate guides for the most important techniques — we highly recommend that you check them out, especially if you have an image-heavy website:
-
Use the most performant image formats:
- Image file formats, such as JPG, PNG, GIF, etc., use different algorithms (a.k.a. codecs, which stands for coder-decoder) to compress images into data streams that can be transferred over the internet. Each image format has its own set of visual features and comes with different performance results.
- In our detailed image format guide, we look into the most commonly used image formats, including next-generation images, and make some hands-on recommendations that can help you find the best image formats for your site.
-
Serve responsive images:
- You can make slow loading websites faster by providing more than one image source file for the same image element so that each user’s browser can pick the one that best fits the present conditions.
- In our comprehensive guide to responsive images, we show you in detail how to implement responsive images on your website, including lots of code examples and some theoretical background too.
-
Lazy load out-of-view images:
- Lazy loading is a popular web performance optimization technique that allows you to only request and download resources shortly before they’re needed.
- As a rule of thumb, only lazy load out-of-view images (e.g. images below the fold, in an off-canvas area, in inactive tabs or slides, etc.) and never lazy load above-the-fold images as they need to download as fast as possible to provide users with a good experience.
- In our tutorial on how to lazy load images, we show you how to use the
loading=”lazy”attribute, including some code examples and the most common issues.
-
Prioritize above-the-fold images:
- You can make your above-the-fold images load faster by prioritizing them using priority hints.
- In our tutorial on priority hints, we look into how to use the
fetchpriorityattribute to make critical resources load faster.
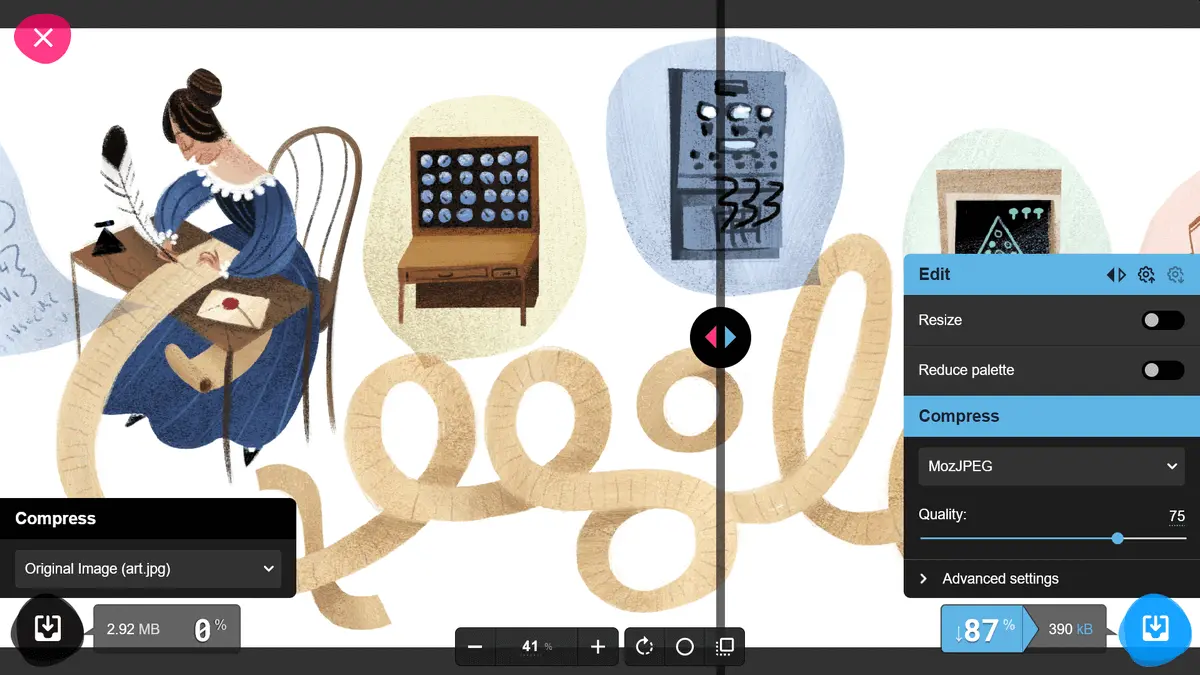
You can also reduce image weight by compressing your images to the same format using an image compression app such as Squoosh (see the screenshot below) or an image optimization plugin if your site runs on a content management system such as WordPress.
10. Reduce Your DOM Size
‘Avoid an excessive DOM size’ is a Lighthouse flag that refers to the high number and/or depth of DOM elements on a page.
DOM stands for Document Object Model which is the programmatic representation of a web page in JavaScript. It’s created by the browser while it’s parsing the HTML page. It consists of a tree-like structure of DOM nodes, which can be either text nodes or HTML elements such as the <img> tag.
An excessive DOM size can slow your page down because it takes longer for the browser to render the content and later, when the user interacts with the page, to recalculate the layout.
If you have long pages, several nested lists, hidden content (e.g. tabs, sliders, off-canvas areas, etc.), or a complex menu or use a visual page builder tool such as Elementor or Divi for WordPress, it’s worth checking your DOM size, as reducing the number of DOM nodes can make slow loading websites faster.
You can do so by running a Lighthouse audit for your longer or more complicated pages which may have an excessive DOM size:
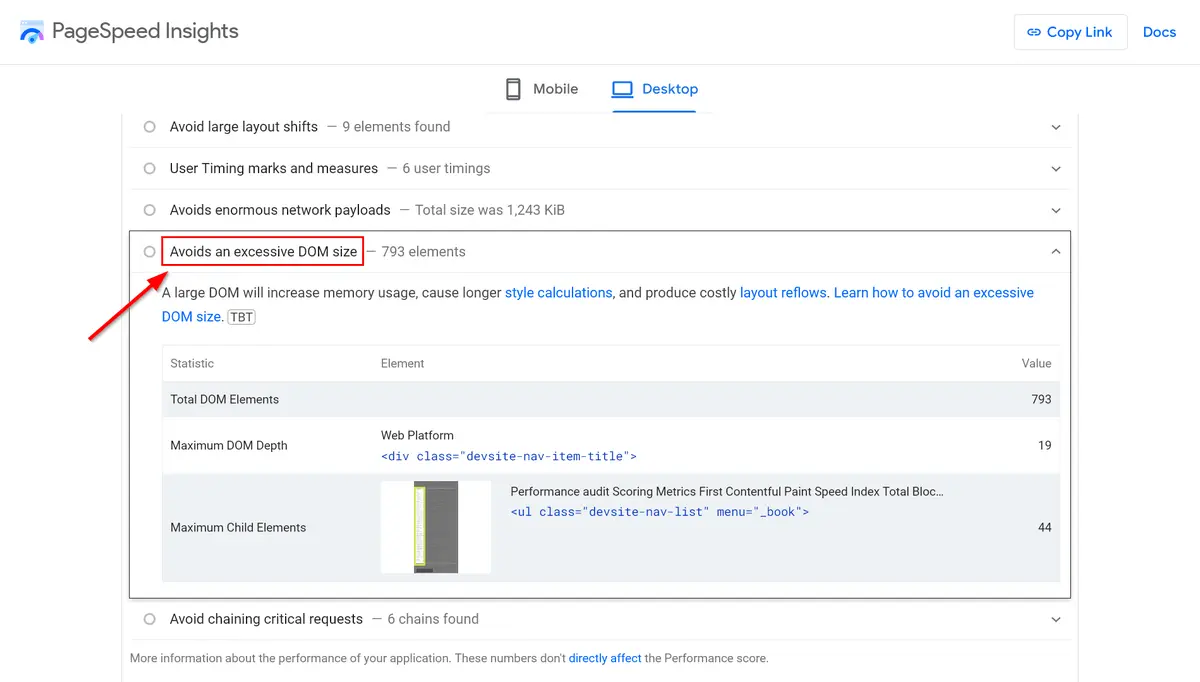 Image: PSI audit for Chrome Developer’s ‘Avoid an excessive DOM size’ page
There are many ways to reduce the DOM size of a web page. For example, you can:
- break up long pages into multiple shorter ones
- reduce the number of additional content elements such as sidebar widgets
- simplify your menu(s)
- flatten your HTML structure (e.g. use fewer nested lists, decrease the number of child elements, etc.)
- avoid using page builders that add bloat to your HTML
- implement pagination or infinite scrolling
- … etc.
Additional Resources to Make A Website Load Faster
Looking for more suggestions on how to test and improve slow loading websites? Check out these articles, too:
- Optimize website performance using request waterfalls
- Fix LCP issues on your website
- Learn how to make fast websites
Start Fixing Slow Loading Websites Today
In this article, we looked into how to make slow loading websites faster, including moving to a fast web host, using content delivery networks, compression methods, and modern network protocols, setting up caching, and implementing various code and image optimization techniques.
Using a frontend performance monitoring tool such as DebugBear can help you detect your key issues, run website tests under various conditions, and make slow loading websites faster.
To get started, take a look at our interactive demo, run a free website speed test, or sign up for our 14-day no-credit-card free trial which will give you tons of useful ideas on how to make slow loading websites faster.


Monitor Page Speed & Core Web Vitals
DebugBear monitoring includes:
- In-depth Page Speed Reports
- Automated Recommendations
- Real User Analytics Data