Test web performance with Netlify and DebugBear
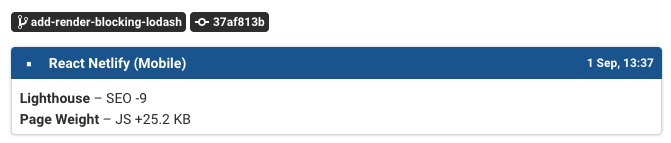
The DebugBear Netlify Build Plugin can test how code changes in your Netlify project will impact page performance and Lighthouse scores.
With the build plugin installed, every Netlify site deployment will trigger a DebugBear test for the deployed site.
Installing the build plugin
You can install the DebugBear build plugin from the Netlify plugin directory or using NPM.
Via the Netlify plugin directory
Via your repo
First, add the build plugin to your package.json using npm:
npm install netlify-build-plugin-debugbear
Then add the plugin to your netlify.toml file:
[[plugins]]
  package = "netlify-build-plugin-debugbear"
Configuring tests
Two Netlify environment variables are required to run your tests:
DEBUGBEAR_API_KEY– an API key for your DebugBear projectDEBUGBEAR_PAGE_IDS– IDs for the DebugBear pages you want to test
Say you're monitoring example.netlify.app/about on DebugBear. You include the page ID in your DEBUGBEAR_PAGE_IDS environment variable.
Now you deploy a new branch with Netlify, with the deployment URL example-feature.netlify.app. DebugBear will test the URL example-feature.netlify.app/about and compare the test results to the same page on production.
Build statuses
By default all builds will finish in a neutral state. If you specify a performance budget for your page builds will fail if the budget is breached, or pass if the performance budget was adhered to.
Reporting results to GitHub
Enable the DebugBear GitHub integration to view the results of each build as part of your GitHub pull requests.